A Quiet Place: The Road Ahead All Collectible Locations
This guide will show you where to find every collectible in A Quiet Place: The Road Ahead.
🎮 Find more A Quiet Place: The Road Ahead guides here.
This guide will show you where to find all 217 collectibles in A Quiet Place: The Road Ahead. These are:
35 Toys (Space Shuttles)
19 Mixtapes
159 Documents
4 Briefcases
This game is divided into 10 chapters. If you miss any collectibles you can repeat the chapters via the Story Act (Chapter Select) feature on the main menu after finishing the chapter at least once.
Chapter Index
The Ranch
The Hospital
The Forest
The Lake House
The Campsite
The Trainwreck
The Chase
The Pump Station
The Harbor
The Fire Station
The Ranch
Document 1/15 (Loud Natural Sounds). On a table in front of you below some writing on the wall as soon as you start the chapter (just below a hole in the wall).
Document 2/15 (Red Cloud Ranch Flyer). Found on a table in the area to your left as soon as you start the chapter.
Toy 1/3. Just past the previous document you will see a destroyed wooden structure. The toy can be found on the ground behind it.
Toy 2/3. Continue around the outside of the main house, past the red barn to find a window you can climb into at the end. Once inside you will find the toy on the shelf in front of you.


Document 3/15 (About A Vent). From the previous collectible, open the door with the corpse against it to enter the main house. Follow the markings on the floor into the next large room with columns. Here you will find a desk at the end with 2 US flags. The document can be found on this desk.


Document 4/15 (Romantic Message). In the same large room where we previous collectible was, go to the area with the columns. Here you will find an area with sofas and a table. The document can be found on one of the sofas.
Mixtape 1/2 (Horses). Found in the drawer behind the sofa with the previous collectible.
Document 5/15 (Romantic Answer). Head up the stairs in the large room. You will find the document on the table at the top.


Toy 3/3. Soon you will collect a screwdriver to open a vent. Once you enter the vent, take the left path to find the toy at the end.


Document 6/15 (Radio Message Note). After coming out the other end of the vent, you will find a small room on your left. The document can be found on the desk (this is the same room where you get the key to advance the main story).
Mixtape 2/2 (Black Metal & Kitties). Once you have the key from the office where you found the previous collectible, go out to the large room with the columns and go back upstairs. Here, open the first door on the left to enter a bedroom with a bloody bed. The mixtape can be found in the drawer to the left of the bed.


Document 7/15 (Flower Picker Message). On the bedside table on the other side of the bloody bed.
Document 8/15 (Concerned Message). From the bloody bed, turn around and go through the destroyed wall to find another bed. The collectible will be on the bedside table.
Document 9-15/15 (Drawing Of Yoshie, Drawing Of Dad, Drawing Of Mom, Walking To School With Dad, Drawing Of Dad And Son, Drawing Of A Monster & Nursery Rhyme). Scattered around the basement (you will get here during the main story path). 2 on the table against the wall, 1 on the round table in the middle of the room, 1 on the wall above the mattress on the floor, 1 on the round table against the wall near the mattress and 2 on the wall above another bed against the wall.


The Hospital
Document 1-9/36 (Lyrics Draft, Song Ideas, I’m Here, Happy Anniversary!, Damaged Porch Photo, Damaged Swing Photo, Damaged Dock Photo, Julia’s Photo & Baby Names). These 9 documents can be found scattered around the small room where you start the hospital area. 1 on the bed, 4 on the cork pin board, 1 on the floor near the vent, 1 on the desk, 1 under the desk and 1 in the wardrobe.
Document 10-14/36 (Unfinished Letter, Exchange With Martin, Laura’s Responsibility, Martin’s Postcards & Open Mic Night). After leaving the first room, open the door on your left to enter another small room. The 5 documents can be found around this room. 1 on the floor on your right, 2 on the desk, 1 on the cork board and 1 on the bed.
Document 15/36 (Mark To Kenneth). Leave the room with the previous collectibles to find the document on the floor next to the door to room 101 (the last one on the right).

Document 16/36 (Debris). After going through the small gap next to the previous collectible you will see a glass door with some NPCs on the other side. At the door, go right to find the collectible on another cork board.


Document 17/36 (Rations Cut). Now take the path on the left of the glass door to find the document on the cork board to you right as you go down the hall.
Document 18/36 (A Promise). On the chair at the end of the hall just past the previous collectible.
Document 19/36 (Mark In Charge). After going down the stairs just after the previous collectible, you will see this document on the corkboard on the right side of the hall.
Document 20/36 (Medicine Cabinet). On a board just outside the room where you get your first torch battery.
Document 21/36 (Radio Silence). Just after the previous collectible you can go left (to the chapel) or right. Take the right path to find the document on a board on the right side of the hall.


Document 22-24/36 (Julia & Kenneth, Annotated Map & Never Forget). Once you loop all the way back around to the starting area of the hospital and going back through the small gap with the mattress against the wall, you will notice that the door on your left is now open. The 3 collectibles will be inside.
Document 25-33/36 (People Are Leaving, Torn Photo, Wild Sketch, Robert Sketch, Martin’s Sketch, Disturbing Sketch, Condolence, A Letter Before Leaving & Martin And Robert) . These 9 documents can be found around the room that you land in once you come out of the vents after your first encounter with the enemy. 5 can be found in the desk, 2 can be found on the floor just below the vent, 1 can be found on the bed and 1 can be found on the mirror in the bathroom.
Document 34/36 (About Insulation). After leaving the room with the previous 9 collectibles, look left to find this document on the chairs on the left side of the hall.
Toy 1/3. Enter room 111 (the door just past the previous collectible) to find the toy in a drawer.


Document 35/36 (Rationing). After going down the stairs you will see a hole in a destroyed wall on your right. Go through it to find the document on the desk.
Toy 2/3. Found on a table in the same room as you get a key after going through another vent (story related).
Mixtape (For Beth). Leave the room where you found the previous toy and go left. Then unlock the door from the inside to reach a new hall with “<- Entrance” painted on the wall. Here go right and follow the path to the end to find a door to a small office on the right. You will find the mixtape in the drawer in this office.


Document 36/36 (Leaving The Hospital). Return to the hall with “Entrance” painted on the wall and this time go left. Then follow this path until you reach the main entrance reception. Here you will find the document to the right of the desk.


Toy 3/3. Close to the end of the level you will be in an underground parking lot with the creature. Your objective is to leave through the door with the green sign above it. Before you leave, look for the toy behind a large red car on the opposite side of the parking lot from where you entered.


The Forest
Document 1-2/13 (The Squirrel & Drawing Of A Squirrel). In front of you on the wooden notice board at the start of the level.
Document 3-4/13 (The Bees & Drawing Of A Bee). From the start, take any of the paths and you will soon come across another wooden notice board. The documents are pinned to this board.

Document 5-6/13 (The Owl & Drawing Of An Owl). From the board with the previous collectibles, take the left path by going under the tree trunk. You will soon see a lone street lamp with another board next to it. The documents will be on this board.
Toy 1/3. In the same area as the previous collectibles and street lamp. From the board, look to your left to find it near a tree.
Document 7/13 (About Asthma Pills). Once you get to the area with the destroyed train tracks, go around the back of the house to go inside. The document will be on the table in front of you next to the door you can open as a shortcut.
Document 8/13 (About Planks). From the previous document, climb through the window on your left. You will find this document on the table on the other side.
Mixtape 1/2 (Chased By Wolves). After picking up the key in the same room as the previous collectible, head back outside through the hole in the wall that you used to get in and go right. Open the gate and follow the path around to the back of the house. Here, use the box to jump through another window to get back inside. Once inside, open the right drawer to find the tape.


Toy 2/3. After using the plank to cross the destroyed train tracks, jump over the boxes on the left side of the train carriages. On the other side of the boxes, go through the gap between the 2 carriages on your right, then go right again to find the toy.


Document 9/13 (Soldier’s Message). On the left side of the tunnel where the red lights are just before you exit it.
Toy 3/3. Once you get to the area where the creature is walking around with you, go down the ramp on the right side of the area to go down to the second flat area. Here, look for a yellow marking on the wall on the right side of this area. Climb it to find the toy.
Document 10/13 (Disturbing Message). Continue through the level until you go through a hole in a fence. On the other side of the fence you will be in the outside a house. Here, go up the stairs on your right to find the document outside the front door.
Document 11-12 (Old Woman’s Diary & Poem). After going through the basement of the house you will go up some stairs to emerge back into the ground floor of the house. Here, go around to your left to find one of the documents on the wall and the other on the floor near the kitchen.

Mixtape 2/2 (Poetry) & Document 13/13 (Girl’s Diary). Go upstairs to the next floor of the house and enter the first door on your left. Both collectibles will be in the bedroom in plain sight.


The Lake House
Document 1/24 (Birthday Card). Found on a table in the barbecue area with the 3 NPCs.
Briefcase 1/1. Found in the shed in the barbecue area. The code to open it is 481 (you can find the numbers carved into wooden items around the garden).


Mixtape 1/1 (Live Bootleg), Document 2-3/24 (Ticket Stubs & Gift Reminder). Found inside the briefcase.
Document 4-8/24 (Swing Photo, Porch Photo, Dock Photo, Photo Album Note & Birthday Puzzle). Found in the shed scattered around the briefcase.
Toy 1/3. After talking to Martin you can go inside the house. The toy is found next to the TV.
Document 9/24 (Vinyl Records). Under the record player to the left of the TV.
Document 10-13/24 (Laura’s Degree, Trophy, Scientific Achievement Award & Robert’s Degree). Before heading into the kitchen, go around to the left to find a trophy stand with these 4 documents.
Document 14/24 (Cake Recipe). Found on the kitchen table.
Document 15/24 (Magazine). After picking up the vinyl record off the kitchen table (story item), go upstairs to find this document at the end of the hall.
Toy 2/3 & Document 16-21/24 (Crumbled Letter, Novel In Progress, Helping A Friend, Ripped Page, Ripped Note & A Stack Of Books). Go through the door to the right of the previous document. You will find these 7 collectibles in plain sight scattered around the bedroom.


Document 22/24 (Ciao From Italy!). Leave the bedroom and enter the door in front of you on the other side of the hall. The document hill be on the desk.
Toy 3/3. Found on the table in front of you once you use the ladder to get to the attic. Make sure you collect this before interacting with the vinyl record next to Martin (this will end the chapter).
Document 23/24 (Laura’s Photo). On a shelf in the attic near a sofa. Make sure you collect this before interacting with the vinyl record next to Martin (this will end the chapter).
Document 24/24 (Essay). On a small table in the attic near the ladder you used to climb up. Make sure you collect this before interacting with the vinyl record next to Martin (this will end the chapter).
The Campsite
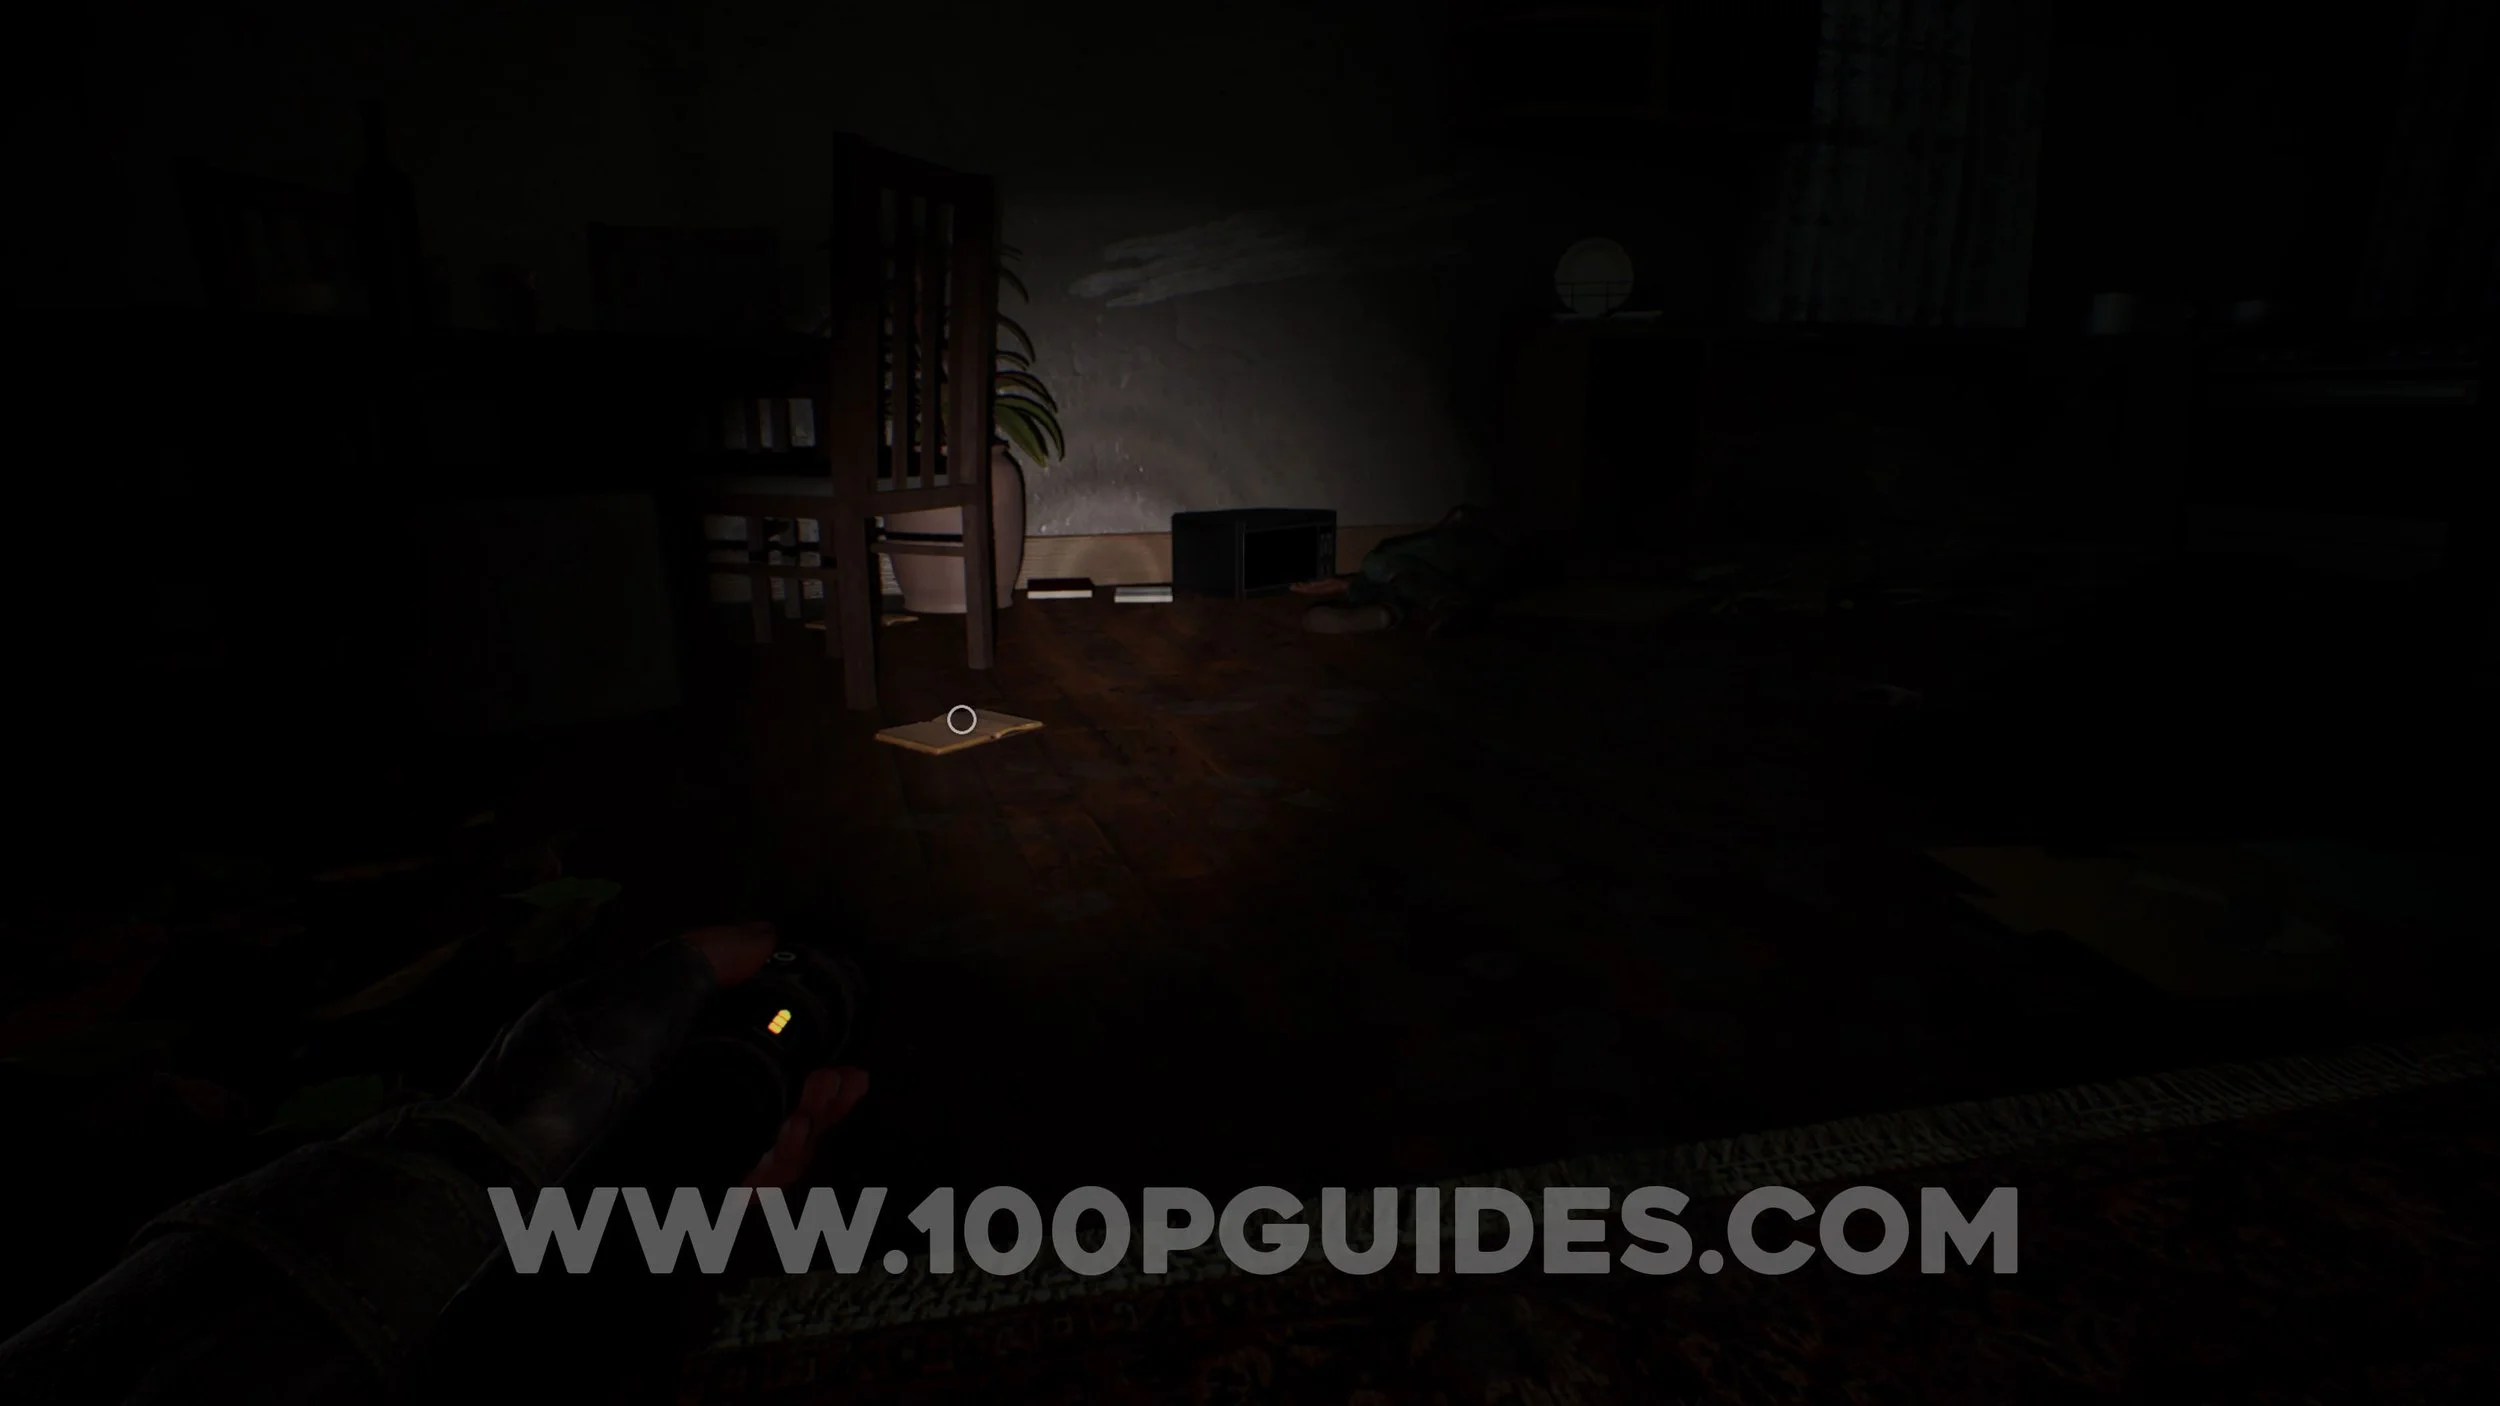
Toy 1/4. Once you reach the caravan at the start of the level, climb onto the box and then drop down the other side to find the toy.
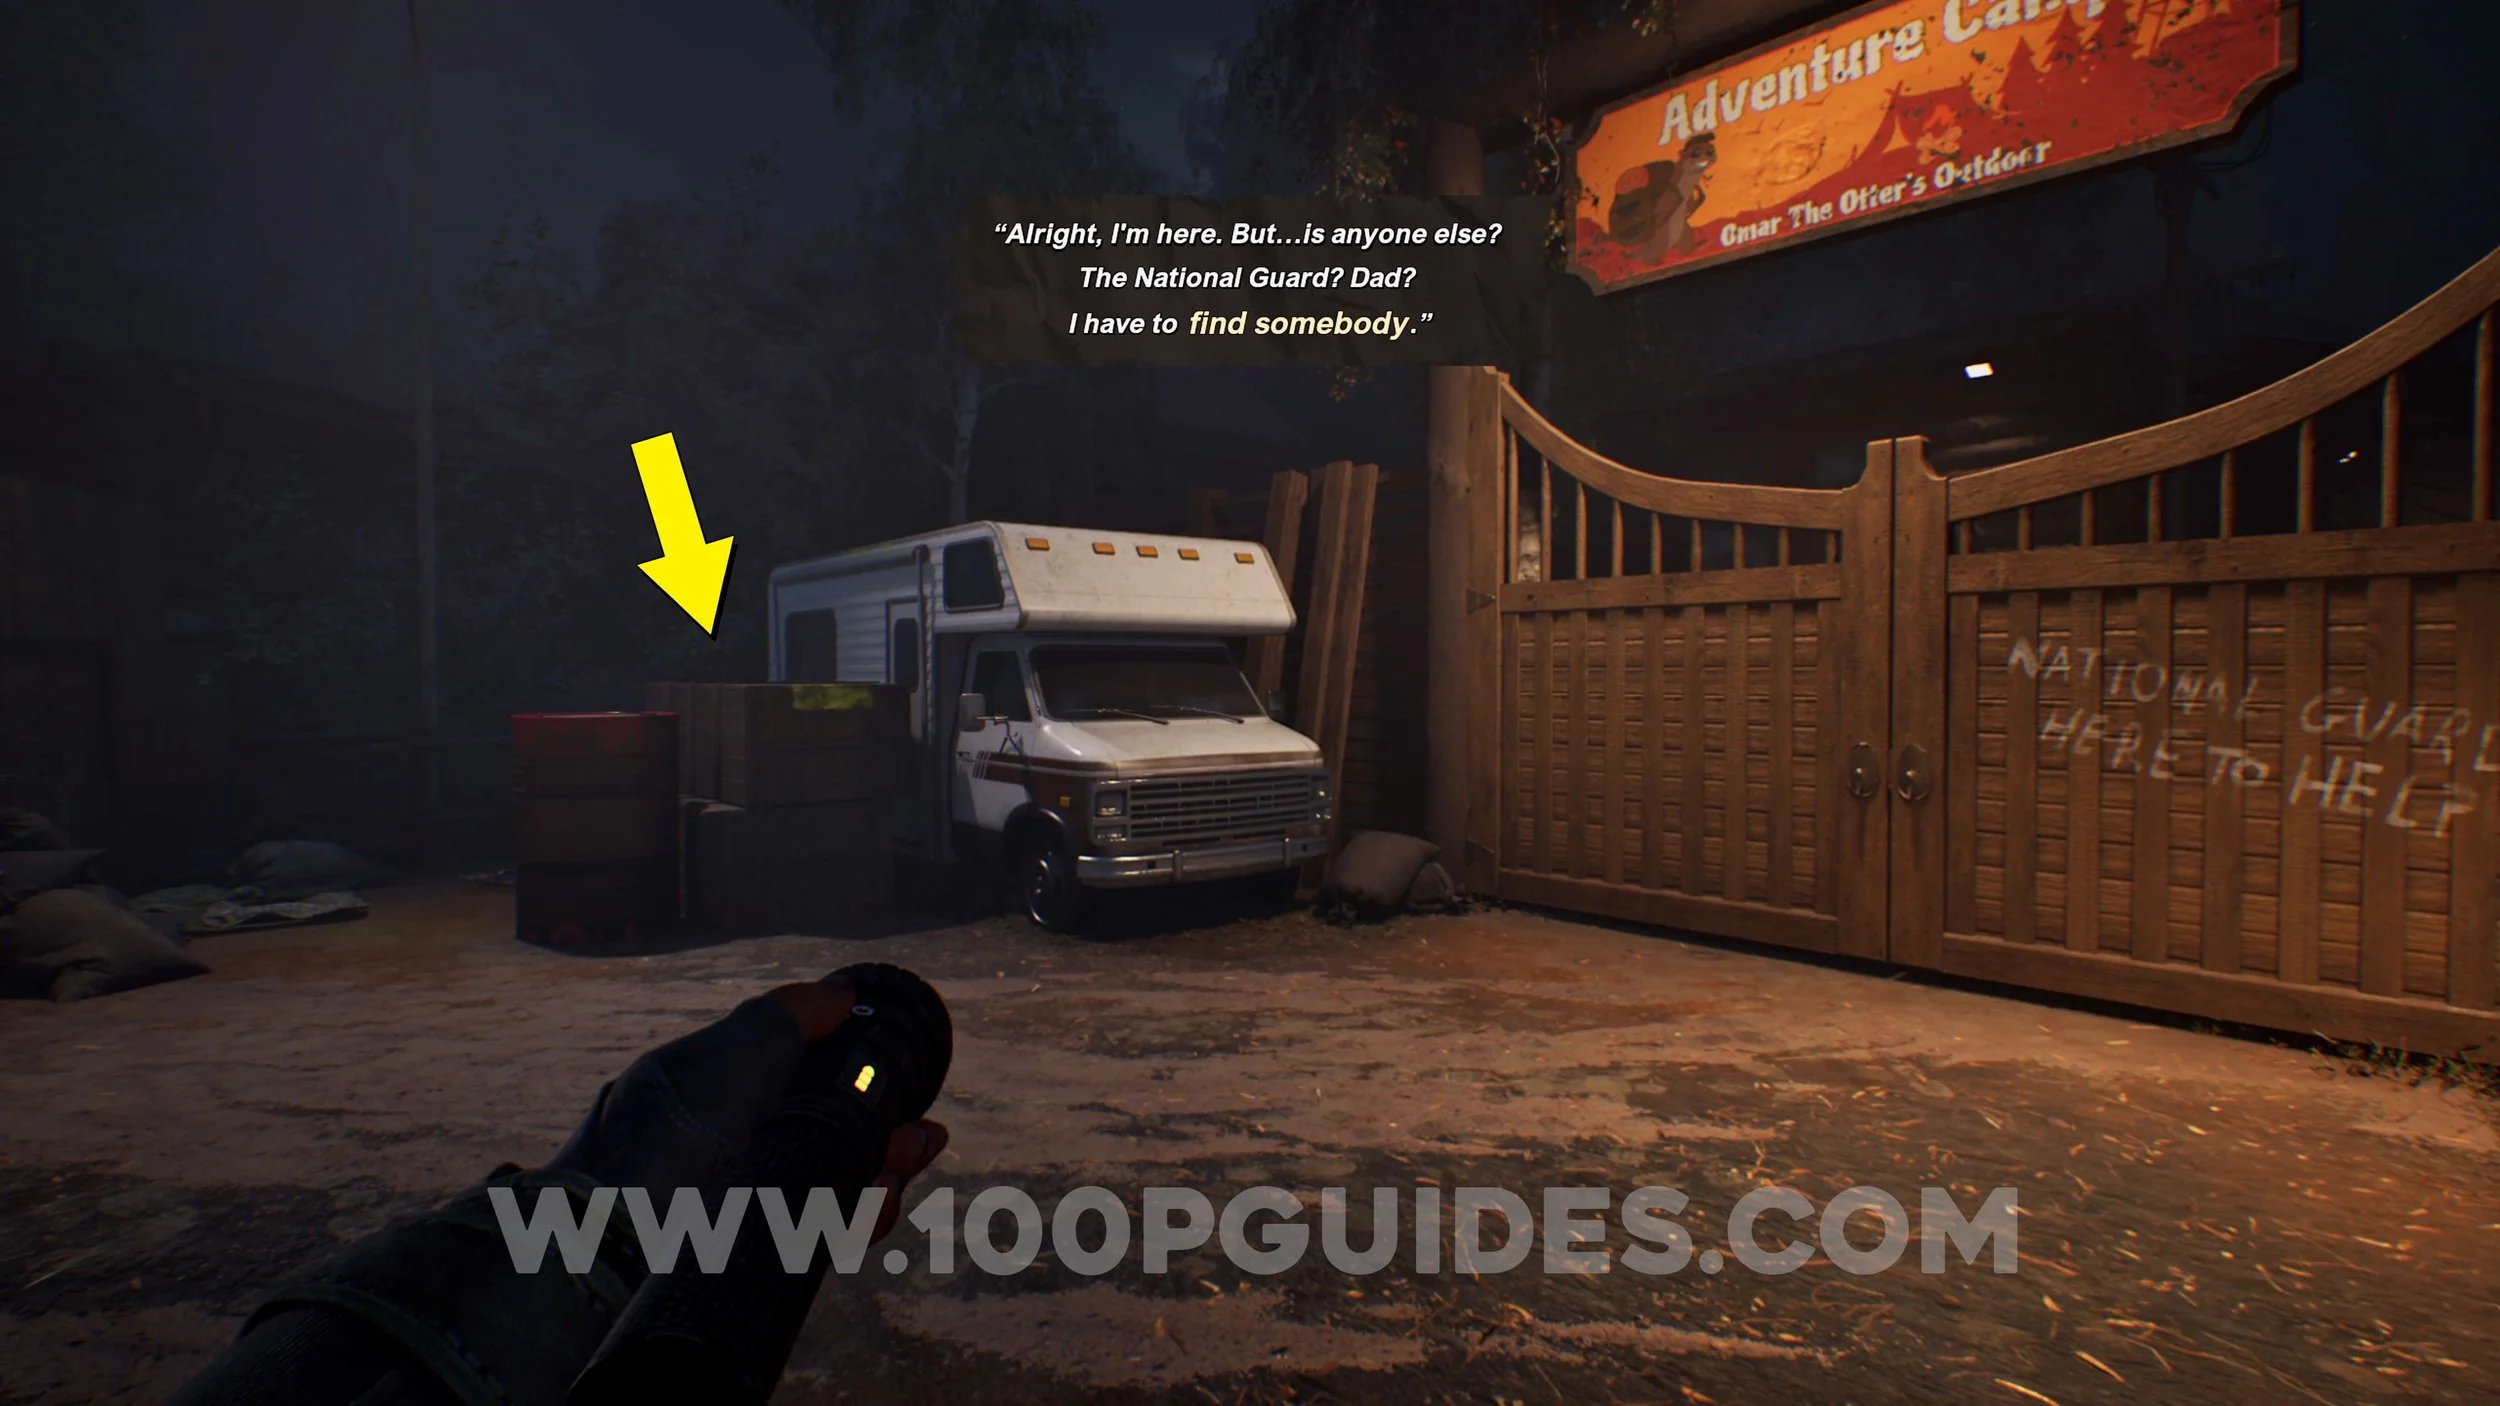
Document 1/14 (Camp Leader Welcome). After jumping over the fence using the caravan, crouch under the green kayak. Then go right to get to the front door of the building. The document will be on the floor just outside the door.


Document 2/14 (Bear Traps). From the previous collectible, turn around and go down the stairs. You will see a blue barrel just before some stairs on your left. The document will be on that barrel.
Document 3/14 (Last Words). Go up the stairs to the left of the previous collectible and under the wire. You will then see a piece of wood you can vault over on your right. Do not vault over and look for a document on the barrel to the left.
Mixtape 1/2 (Omar The Otter). Continue around the left of the previous collectible to find it on the table.
Document 4/14 (National Guard Orders). Continue through the level by turning around and going back past the barrel with the previous document. You will then see a climbable wall at the end. On the other side, use a bottle to get rid of one of the bear traps and climb another wall. On the other side you will see the document on the box straight in front of you.


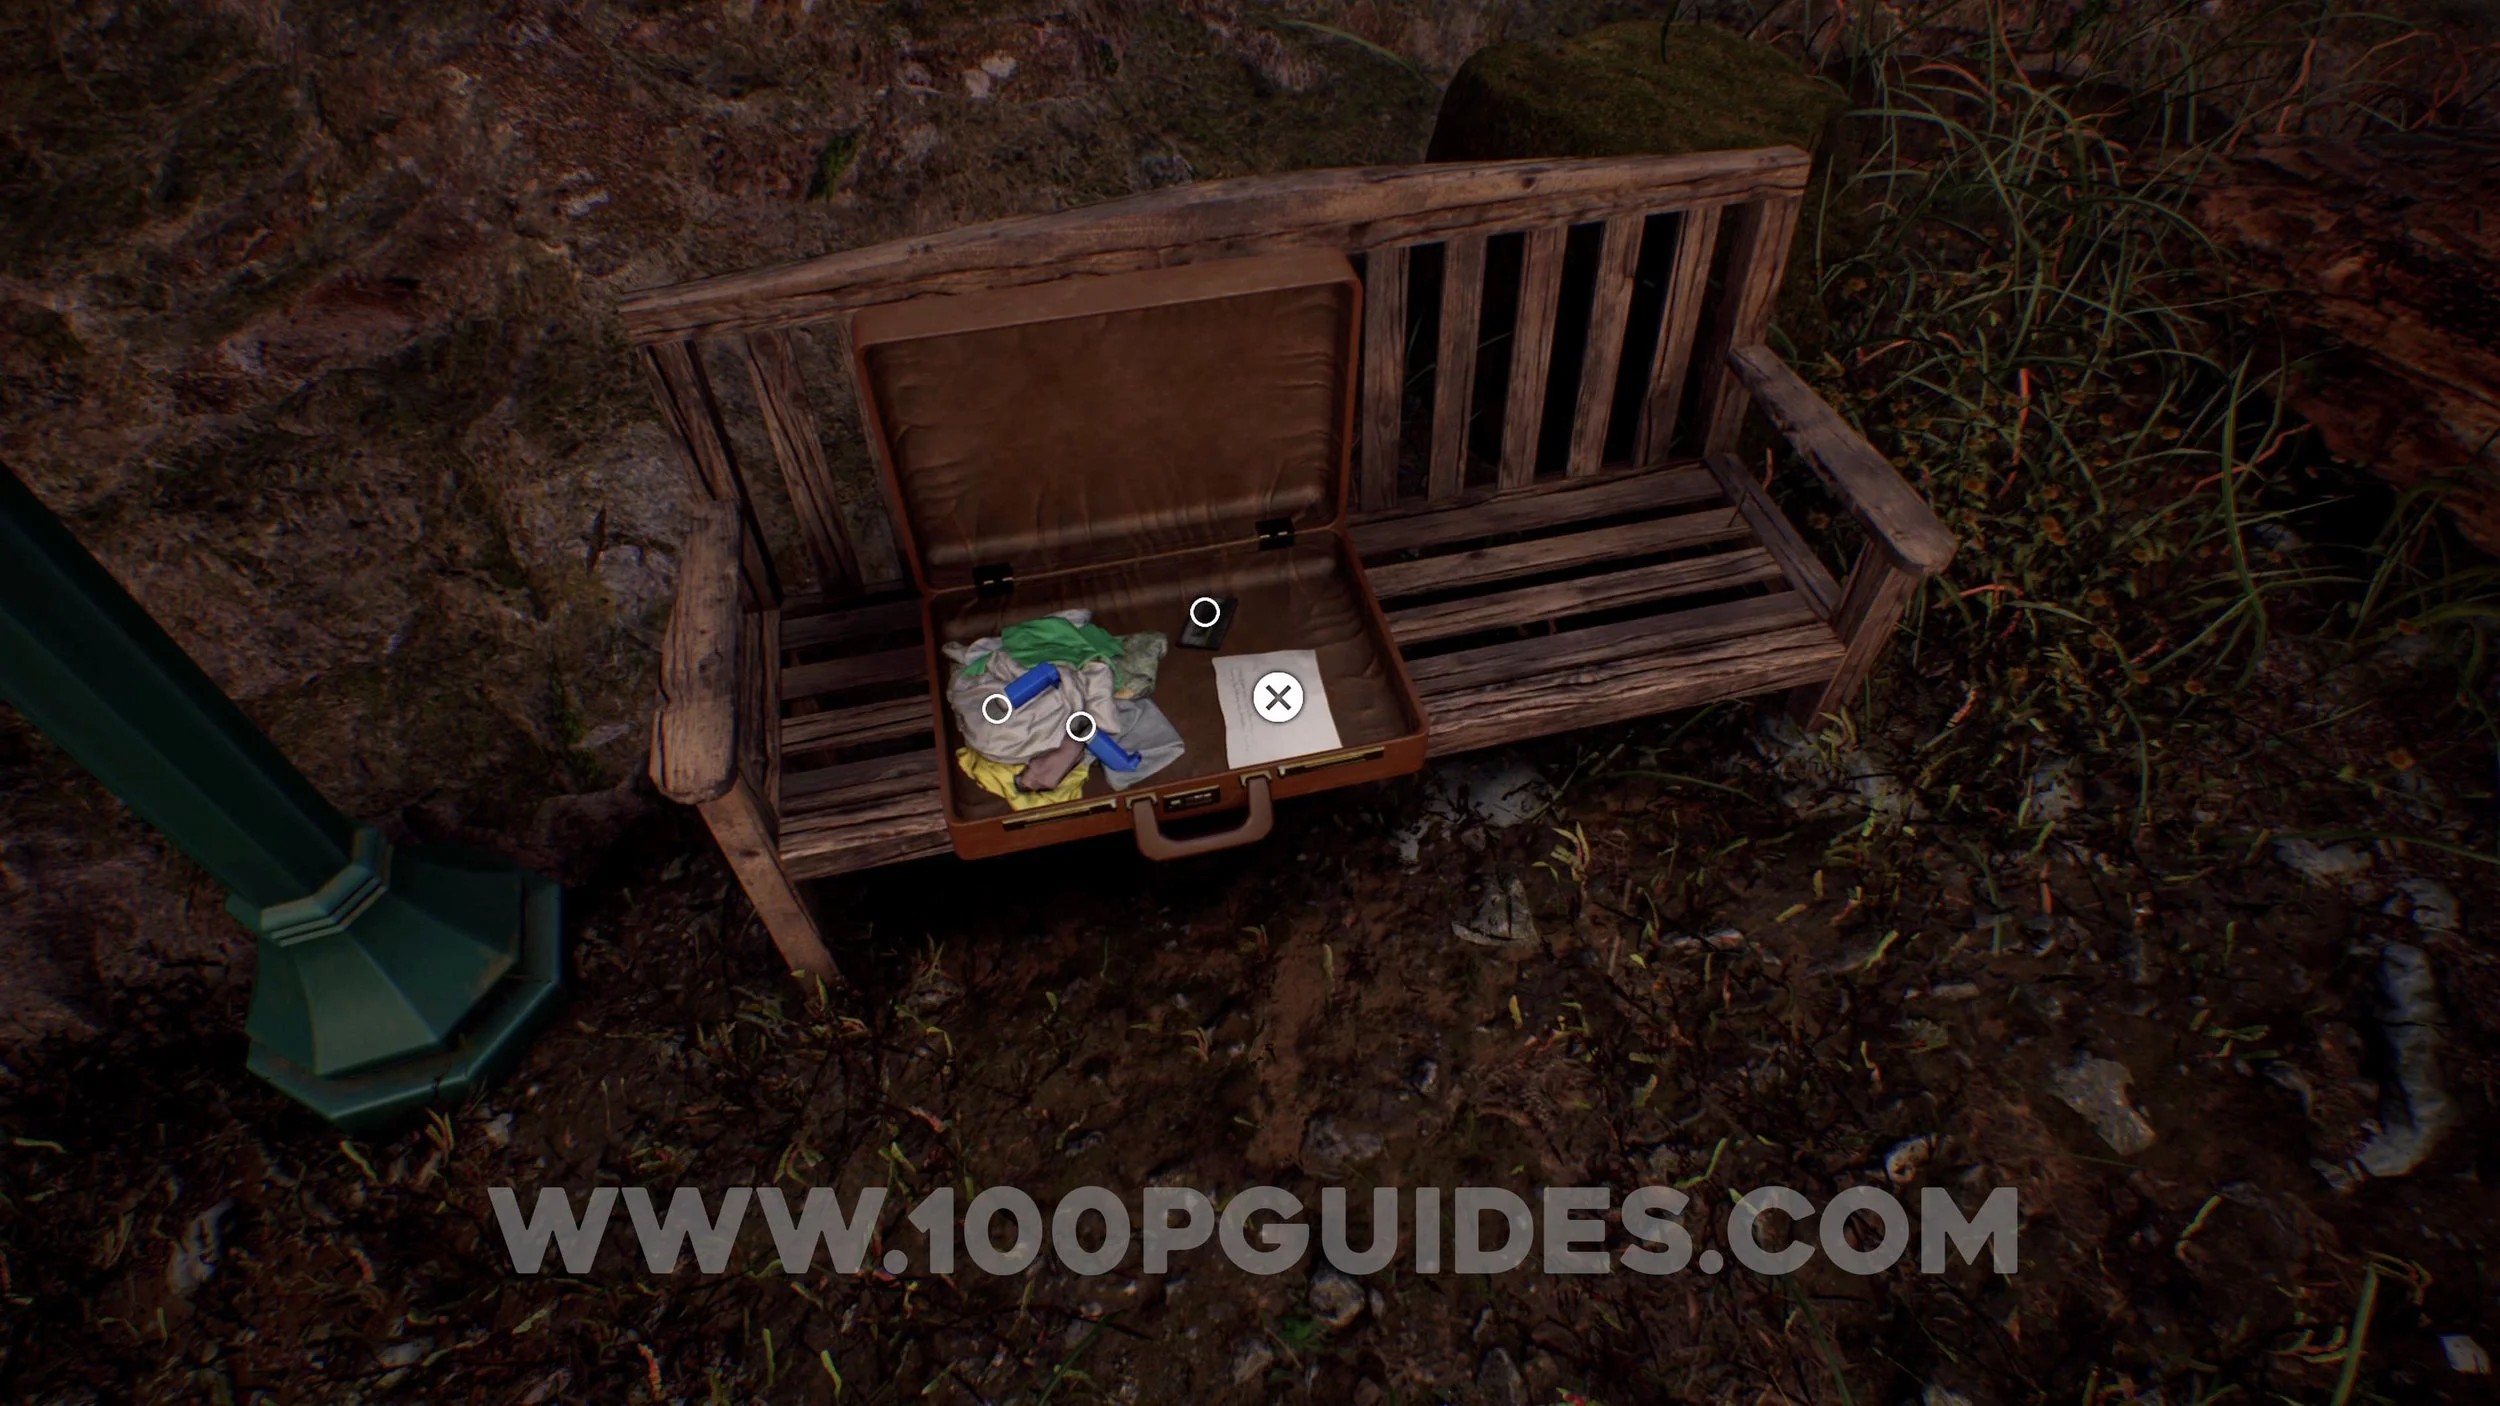
Document 5/14 (Kids’ Chat). On a bench to the right of the previous collectible.
Document 6/14 (Madman’s Memories #1). After deactivating the first trap, go left at the signs. You will then have to climb onto some logs. The collectible can be found on top of the logs before dropping down the other side.


Document 7/14 (Madman’s Memories #2). On the table in front of you after dropping down from the previous collectible.
Toy 2/4. After deactivating another 2 traps in the area with the creature walking around you will see some climbable boxes on your right. Do not climb them and continue down the path into the forest to the left. You will soon see another trap on your right. Deactivate it and go down that path until you see the toy at the end.


Document 8/14 (Madman’s Memories #3). Return to the previous area and this time climb over the boxes. On the other side, look for the document on the ground near a box to the left of the green info board.


Document 9/14 (About Powering The Watchtower). Continue through the level until you have to climb up a yellow ladder. At the top you will see a watchtower with a red light on the fence. The collectible can be found right next to the red light.


Document 10-11/14 (Madman’s Vengeance & Photo Of A Girl). From the previous collectible, go through the gate with a green light on your left. To get into the next building get a bottle from the bin to the left and through it at the trap inside the window (try and do it as fast as possible and as close as possible to the window). Once inside, after going through 2 thin gaps you will see a corpse behind some shelves on your right. Crouch through the gap to get to the corpse and the documents.


Toy 3/4. After activating the power in the same building as the previous collectible, climb the watchtower and use the radio. After climbing down from the watchtower, open the locked gate. On the other side of the gate, look for a small ramp on your left to find the toy at the top.
Toy 4/4. Continue on the main path by following the cable, going through a thin gap and the crouching under a house until the paths slit. First, go down the path on your right to find the toy on a bench.


Document 12/14 (A Father’s Request). Go back up the hill and this time take the left path. After going through a thing gap, go left and climb over the caravan. On the other side you will see the collectible on a white box.


Mixtape 2/2 (Cave Sounds). After making your way through the camping area you will get to some mines. Inside, take the right path to find the mixtape on some sacks.


Document 13/14 (National Guard Decision). On the ground to the left of the previous collectible.
Document 14/14 (A Mother’s Gratitude). On the ground in plain sight after leaving the mines.
The Trainwreck
Toy 1/4. After emerging from the first cave to an area with a bridge, go down the wooden stairs to enter another cave. Inside look for 2 wooden boxes on your left. Move them and go through the tunnel behind them to find the toy.


Document 1/13 (Sandbags). Found in plain sight after emerging from the second cave just as you get the “sandbag” tutorial.
Document 2/13. Just past the previous document stick to the right and look for a small path through the rocks and bushes near the first tree. This will take you through a small cave where you can find the document. THIS COULD BE BUGGED ON THE CURRENT VERSION, SOMETIMES THERE WILL BE AN INVISIBLE WALL IN YOUR WAY. YOU MUST UNINSTALL THE GAME AND INSTALL IT WITHOUT ANY UPDATES TO GET THIS COLLECTIBLES.


Toy 2/4. Return to the area with the sandbags and water. Then look for a gap that can’t be crossed without a plank. To the left of this gap look for a small hole blocked by a box. Move the box and go through the hole to continue the level. You will soon get to a plank of wood blocking your path. Pick it up and backtrack until you see a wooden hut on your right that you need to use the plank to get to. Use the plank and go through the hut. Then go to the end of the path on the other side of the hut to find the toy.


Briefcase 1/1 & Mixtape 1/5 (Birdwatching). From the toy, backtrack to the area where the plank was blocking your path and climb up the ledge. Here go right to find the briefcase in the hut. Open the briefcase with the code 369 (the clue can be found on the document #2). The Mixtape can be found inside the briefcase.


Mixtape 2/5 (Post-Rock Madness). Exit the hut with the briefcase and head straight to the end where you will find a cave on your right. The mixtape can be found on a box inside the cave.
Document 3-5/13 (Gven’s Character Sheet, Clindie’s Character Sheet & Game Master’s Notes). Continue on the main path until you drop into a train. The documents will be in this train in plain sight.
Document 6-8/13 (Live Concert Setlist, Live Concert Flyer & Leaving The Band). After leaving the train car with the previous collectibles you will enter another one. The 3 documents can be found on the chairs.
Mixtape 3/5 (Monologue). Leave the train car and you will be in an open area with the creature walking around. Enter the train car on the opposite side (the one the creature comes from) to find the mixtape inside on your right.


Mixtape 4/5 (Purr Purr Heaven). After leaving the train with the previous mixtape, you will be in another open area. Once you get to the other side you will see another train car you can enter. Before entering, head left and climb up to find the mixtape.


Toy 3/4. Enter the next train car and go left to climb into a turned-over train car. Inside, look for a hole (window) that you can use to drop down to the beams below. Cross the first beam on your right, then go left and cross another beam to find the toy.


Document 9/13 (Cartoon). Go back across the beam and head to the end (look for a yellow mark) to climb into another train car. Here you can find the document on a chair.


Document 10/13 (Monologue). From the previous collectible, climb up to the top of the car by following the yellow markers to get the key. Then drop down to the open area (same area as before) and make your way back to the train with the locked door (the one you went through to get to the turned-over car). Open the door with the key and continue on this path until you drop down into the next train car. As soon as you do, turn around to find the document on a chair.


Mixtape 5/5 (Grungy Cat). Found on the bar in the next train car (the one that falls into the water).
Document 11/13 (Restaurant Checklist). Found on a table in the same train car as the previous mixtape.
Document 12/13 (Creatures’ Strange Behavior). In plain sight as soon as you enter the next train car.
Document 13/13 (Get Well Soon). Found on your left as you make your way through the next train car.
Toy 4/4. In the section where you have to avoid the first creatures that use their scanners you will have to climb a yellow ladder. Before you climb the ladder, vault over the structure on the left to find the toy.
The Chase
No collectibles in this chapter.
The Pump Station
Document 1/15 (Flares). Found on the table to your right as soon as you start.
Document 2/15 (About The End Of The World). Continue through the level until you see 3 flares on a table in plain sight. The document will be below them.
Document 3/15 (Loud Machines). Found on the locker to the left of the previous collectible.
Document 4/15 (Pipe Burst). After going through another vent you will see some steam in front of you. The document can be found next to the bucket near the steam.
Toy 1/3. Use the valve to get past the steam, then continue until you climb down a ladder. At the bottom, continue straight ahead and go through the office on your left. Once you come out the other side, go right and then right again. You will then find a small hole in the metal fence on your right that you can go through. On the other side, look to your right to find the toy.


Document 5/15 (Work Planning). From the toy, turn around to find the document on the shelf to your right.
Document 6/15 (Intermittent Water Bursts). Continue through the level until you have to find a valve and connect it to a pipe to get rid of some steam. Soon after this you will jump through a small window on your right. After doing this, look to your left to find the document on the shelf.


Mixtape 1/1 (Relaxing Sounds). Pick up the plank behind the shelf where the previous collectible was found and use it to get to cross the gap on your right. Here pick up a brick and take it back across the plank and use it to break the window on your right. Jump through the window, go to the far end of the room and open the gate on your right. You should now be behind the plank that you used before with the gate open. Grab the plank and turn around to see 2 spots where you can place it. Place it on the far end spot (left spot) and go across it. On the other side, go left and vault into a room with a desk. The mixtape can be found in the large drawer of this desk.


Document 7/15 (Sorry Worker’s Note). Open the door in the room where the previous collectible was found to return to the plank. This time place in on the other spot and cross it to get to a vent you have unscrew. After going through this vent you will find the document on a box to your right.
Document 8/15 (Workers’ Chat). On a chair in plain sight after going through the next door.
Document 9/15 (A Hopeful Mother). Found on your left after squeezing through the gap after the previous collectible.
Document 10-12/15 (The Greatest Gift, Kid And Mom On A Boat & Kid’s Boat). All 3 are found around the chair where you have an asthma attack.
Toy 2/3. In the next vent, take the first left and then go left again to find the toy.
Document 13-14/15 (Pump Rooms Complication & Concerned Worker’s Note). Found on some boxes as soon as you emerge from the vents.
Document 15/15 (Sad Worker’s Note). Found on the floor next to the machine with A, B & C on it in front of you once you leave the hall where the previous collectibles where found.
Toy 3/3. From the previous collectible, go left through a dark tunnel to reach a flooded area. Here, go left (you should see some machines with 4 red lights). Go around the right of these lights and vault over the pipes to get behind the machines where the toy is found.


The Harbor
Document 1/17 (Couple Selfie). After going down the first hill you will see a statue in the middle. You can find the document on the bench on the right side path.
Document 2/17 (List Of Ingredients). Continue down the path to find this document on the table to your left after vaulting over a trunk.
Briefcase 1/2, Mixtape 1/3 (Sweet Stories) & Document 3/17 (Daughter’s Note). Form the previous document, go left and head back towards the start by taking the other path under the trunk. You will soon see a briefcase on a bench. Use code 629 to open it. You will find the document and mixtape inside.

Document 4-5/17 (About Dust & Block’s Power Source). Continue through the level until you go through a garage and climb up a window to get to a back alley. Here you will climb onto a box to enter the Tech Store through a window. The 2 documents can be found in the first room of the tech store.


Mixtape 2/3 (Best Musicals). Continue through the level until you turn on the power in a big warehouse with the creature walking around. The Mixtape can be found in a drawer to the right of the power switch.


Toy 1/6. After activating the power, return to the tech store and open the now unlocked door inside. After a short cutscene, jump out of the window to the right of the entrance. Then jump through the window to the right of the gas station. Inside, open the door on your right to find the toy on a desk.


Briefcase 2/2, Mixtape 3/3 (Choir Concert) & Document 6/17 (Another Note To Self). Head back through the tech store and leave through the main entrance. Then head left and climb the truck to get onto the rooftops. Here climb the ladder and go through the hap between the 2 chimneys. After dropping down, head around to the right to find the briefcase. Open it with code 347 (clue can be found on a future document). Inside you will find a document and a mixtape.


Toy 2/6. From the briefcase head back to the 2 red barrels. Here go right and use the key to open the gate. The toy will be on the other side of the gate.


Document 7/17 (Note To Self). Return to the barrels and this time go left. Then go right at the end. You will then find the document near a corpse (this is the document with the clue to the briefcase).


Document 8/17 (Customer Service). Move the barrels and vault over the pipes to the left of the previous document. Then go around the corner to find the document on the next rooftop.
Toy 3/6. Climb down to the street below and look for a crashed ambulance at the end. The toy can be found behind the ambulance.
Document 9-10/17 (Children’s Book & The Door Code). Continue through the level until you see a short cutscene with a piano in a shelter. After the cutscene one document can be found on the chair and the other next to the door.
Document 11/17 (Diner’s Owner Note). On the desk in the small room to the left of the previous collectibles.
Document 12/17 (Scared Girl Note). Open the door to leave the shelter with code 615. Then once outside, follow the creature down to the area below on your left. At the bottom of the stairs climb the box to the left of the green door to climb through the window where you will find the document.
Toy 4/6. Take the plank outside and use it to cross to the crane. Grab the plank again to cross the next gap. Cross another plank and grab it to cross a 4th gap that takes you to a small hut. The toy can be found in this hut.
Document 13/17 (Evacuation Order). Open the door in the hut where the previous collectible was then grab the plank you used to cross the previous gap and take it through the door you just opened. Place it to cross a gap. Then cross another plank. Now enter the hut on your right to find the document on the table next to the crank.
Document 14/17 (Dock’s Situation). Use the planks to take the crank back to the crane. Then use the crane to move the boat, allowing you to pass. You will see the document on the floor in plain sight after going under the boat.
Document 15/17 (Interrupted Message). Look for a ladder to climb on the building to the right of the previous document. Climb it to enter the warehouse. You will see the document next to a red barrel almost as soon as you enter the warehouse.


Toy 5/6. After the previous collectible, squeeze through the gap. After a short cutscene with the creature, climb down the ladder on your right. At the bottom go right and look for a yellow forklift. At the forklift go right to find a plank on some stairs. Pick it up and go up the stairs. Here use the plank to cross the gap and get the toy.


Document 16/17 (Soldier’s Message). After the previous collectible, climb down and circle around to your right to find the document next to some hooks hanging from the ceiling.
Toy 6/6. To the left of the previous collectible, look for a gap you can crouch under with a flashing light on the other side. Go through and then go up some stairs on your left. At the top, jump through the window to find the toy on your left.


Document 17/17 (Determined Soldier’s Note). Climb back through the window and crouch through the gap in front of you. Then climb down to the area below and go through the door with the light above it. After a short cutscene in the next room you will find the document on the table in the middle.
The Fire Station
Toy 1/6. Once you get to the Fire Station doors, go left, crouch through the gap and vault over the wood to find the toy.
Document 1/12 (The Electrical System). Inside the Fire Station, go through the door straight down the hall (the one with the yellow sign). In this room, vault over the piece of wood to find the document on a barrel to your left.


Document 2/12 (The Last Boat). Enter the door to the left of the previous collectible to find this document.
Document 3/12 (About Fuses). Pick up the fuse and place it into the fuse box in the same room as the previous collectible, then go back to the previous room and go through the door with the green light. Now head through the red door in front of you. On the other side continue straight to find the document on the table with another fuse.


Toy 2/6. Place the fuse into the fuse box behind the table to open the door on the right. Enter it and grab the plank. Use the plank to get to the door with a green light outside. Go through the door and open the fuse box. Change the fuse to the left slot to open the other door in this room. Go through it to find the toy.


Document 4/12 (Sprinkler System). Continue through the level by collecting the fuse from the previous room and the fuse that you used to get the plank. Then use them both on the fuse box that you walked past when you first entered this area through the red door. You will then have to vault over the wood to the left of the fuse box where you picked up the plank. Continue on this path until you enter a room with a screen with “Warning Sprinkler System Failed” on it. The document will be on the desk near the screen.
Mixtape 1/2 (Jokes About Fire). Found in a drawer in the same room as the previous collectible.
Document 5/12 (Grateful Girl’s Message). Right in front of you as soon as you leave the room with the previous collectibles.
Toy 3/6. From the previous collectible turn around and go to the end of the hall. Here turn right to find the toy.
Toy 4/6. Go back down the hall towards the table with the previous document on it and go through the door on the right. Continue down the stairs and move some boxes to enter a vent. After dropping down a second time in the vents, look up to find another higher vent you can climb up to. The toy will be in this vent.


Document 6/12 (Controlling The Water Level). After emerging from the vents, go through the door on your left. Then through the red door. Here pick up the fuse near the screens and place it in the fuse box. This will allow you to open the gate on your left. The document can be found in plain sight on the other side of the gate.
Toy 5/6. Squeeze through the gap near the wall on your left to grab a valve that you can use near the previous document to lower the water. Then go through to the next area and use another valve to lower the water even more. Go down the ladder to find the toy on a barrel.


Document 7/12 (The Training Pool Lights). After using the valve to activate the sprinklers, break the nearby window to find the document inside.


Mixtape 2/2 (Bird Sounds) & Document 8-12 (Firefighter Saving A Cat, Cat In Uniform, Picture Of A Wedding, What Comes Next & The Boathouse Gate). After activating the sprinklers you will have to make your way back to the control room (the room with “Warning Sprinkler System Failed” message on a large screen). Once you get there you will notice another room is now open (the one with the firefighter gear in it). The final 5 documents and final mixtape of the game can be found in this room.
Toy 6/6. After the cutscene with Laura, go through the gate with a green light and activate the switch in the box to open the boat door. Then go left and then left again just before the hole in the fence to grab a fuse from a fuse box. Continue through the holes to get to another fuse box. Place the fuse into this fuse box and open the gate on your left. On the other side move the box on your left and crawl through the hole behind it to get back to the fuse box you just inserted a fuse into. Take the fuse back out and use the hole again to get back to the room where you moved the box. Now place the fuse into the fuse box in this room to unlock the door that will take you to the final collectible in the game.
If you found this guide helpful and would like to support our work, you can do so by pressing the Ko-fi button below