Atomic Heart All Collectible Locations
This guide will show you how where to find every collectible in Atomic Heart. This includes all Chirpers, all Talking dead animals, all Talking Corpses & all Lootyagins. Getting them all will get you the “Beast Friend”, “The Necromancer”, “Burning Ears” & “More Than Profit” trophies / achievements.
Make sure you are scanning at all times by double tapping R1/RB, this will make seeing the collectibles a lot easier.
In this guide we will first cover all area that the main story quests take you, then the optional & open world areas.
Use the index below to go straight to the location you are interested in!
STORY LOCATIONS
Facility 3826
Exhibition Center Electromagnetic Mirror Facility
Exhibition Center (VDNH Complex)
Computational Center
Theater
Infirmary
Pavlov Complex
Lighthouse
OPEN WORLD
Sector 03
Sector 06
Sector 04
Sector 07
Sector 05
Sector 01
TESTING GROUNDS
Testing Grounds
STORY LOCATIONS
Facility 3826 (Story Location)
NOTE: AFTER MEETING GRANNY FOR THE FIRST TIME YOU WILL FALL IN TO FACILITY 3826, ALL COLLECTIBLES IN THIS AREA ARE MISSABLE!
Chirper #1. Just after meeting Granny you will fall in to Facility 3826. The first thing you have to do here is get a valve to open the door. The Chirper is on the ground next to the valve.
Chirper #2. After using the valve to open the door you will encounter an enemy that breaks through a glass window on your left. Jump through this window to find the Chirper on a desk in this room.


Chirper #3. Leave the room where the previous Chirper was found. You will now be in an area with multiple round windows. Enter the room on your right to find a Chirper on the desk next to the robot you can stealth kill.


Chirper #4. Exit the room where the previous Chirper was. You will now find yourself in a big open area with columns in the middle. The Chirper will be on a table in the middle of the area.
Chirper #5. On the left side of the same area you will see an open door to a bathroom. Here you will find the Cirpher on the floor behind the last door.


Chirper #6. On a small wooden box in front of you as soon as you leave the room where you meet NORA for the first time.


Chirper #7. After picking up the key to the administration's service you will see a second Dandelion security camera. The Chirper can be found on a desk in to the room through the hole in the wall to your left.

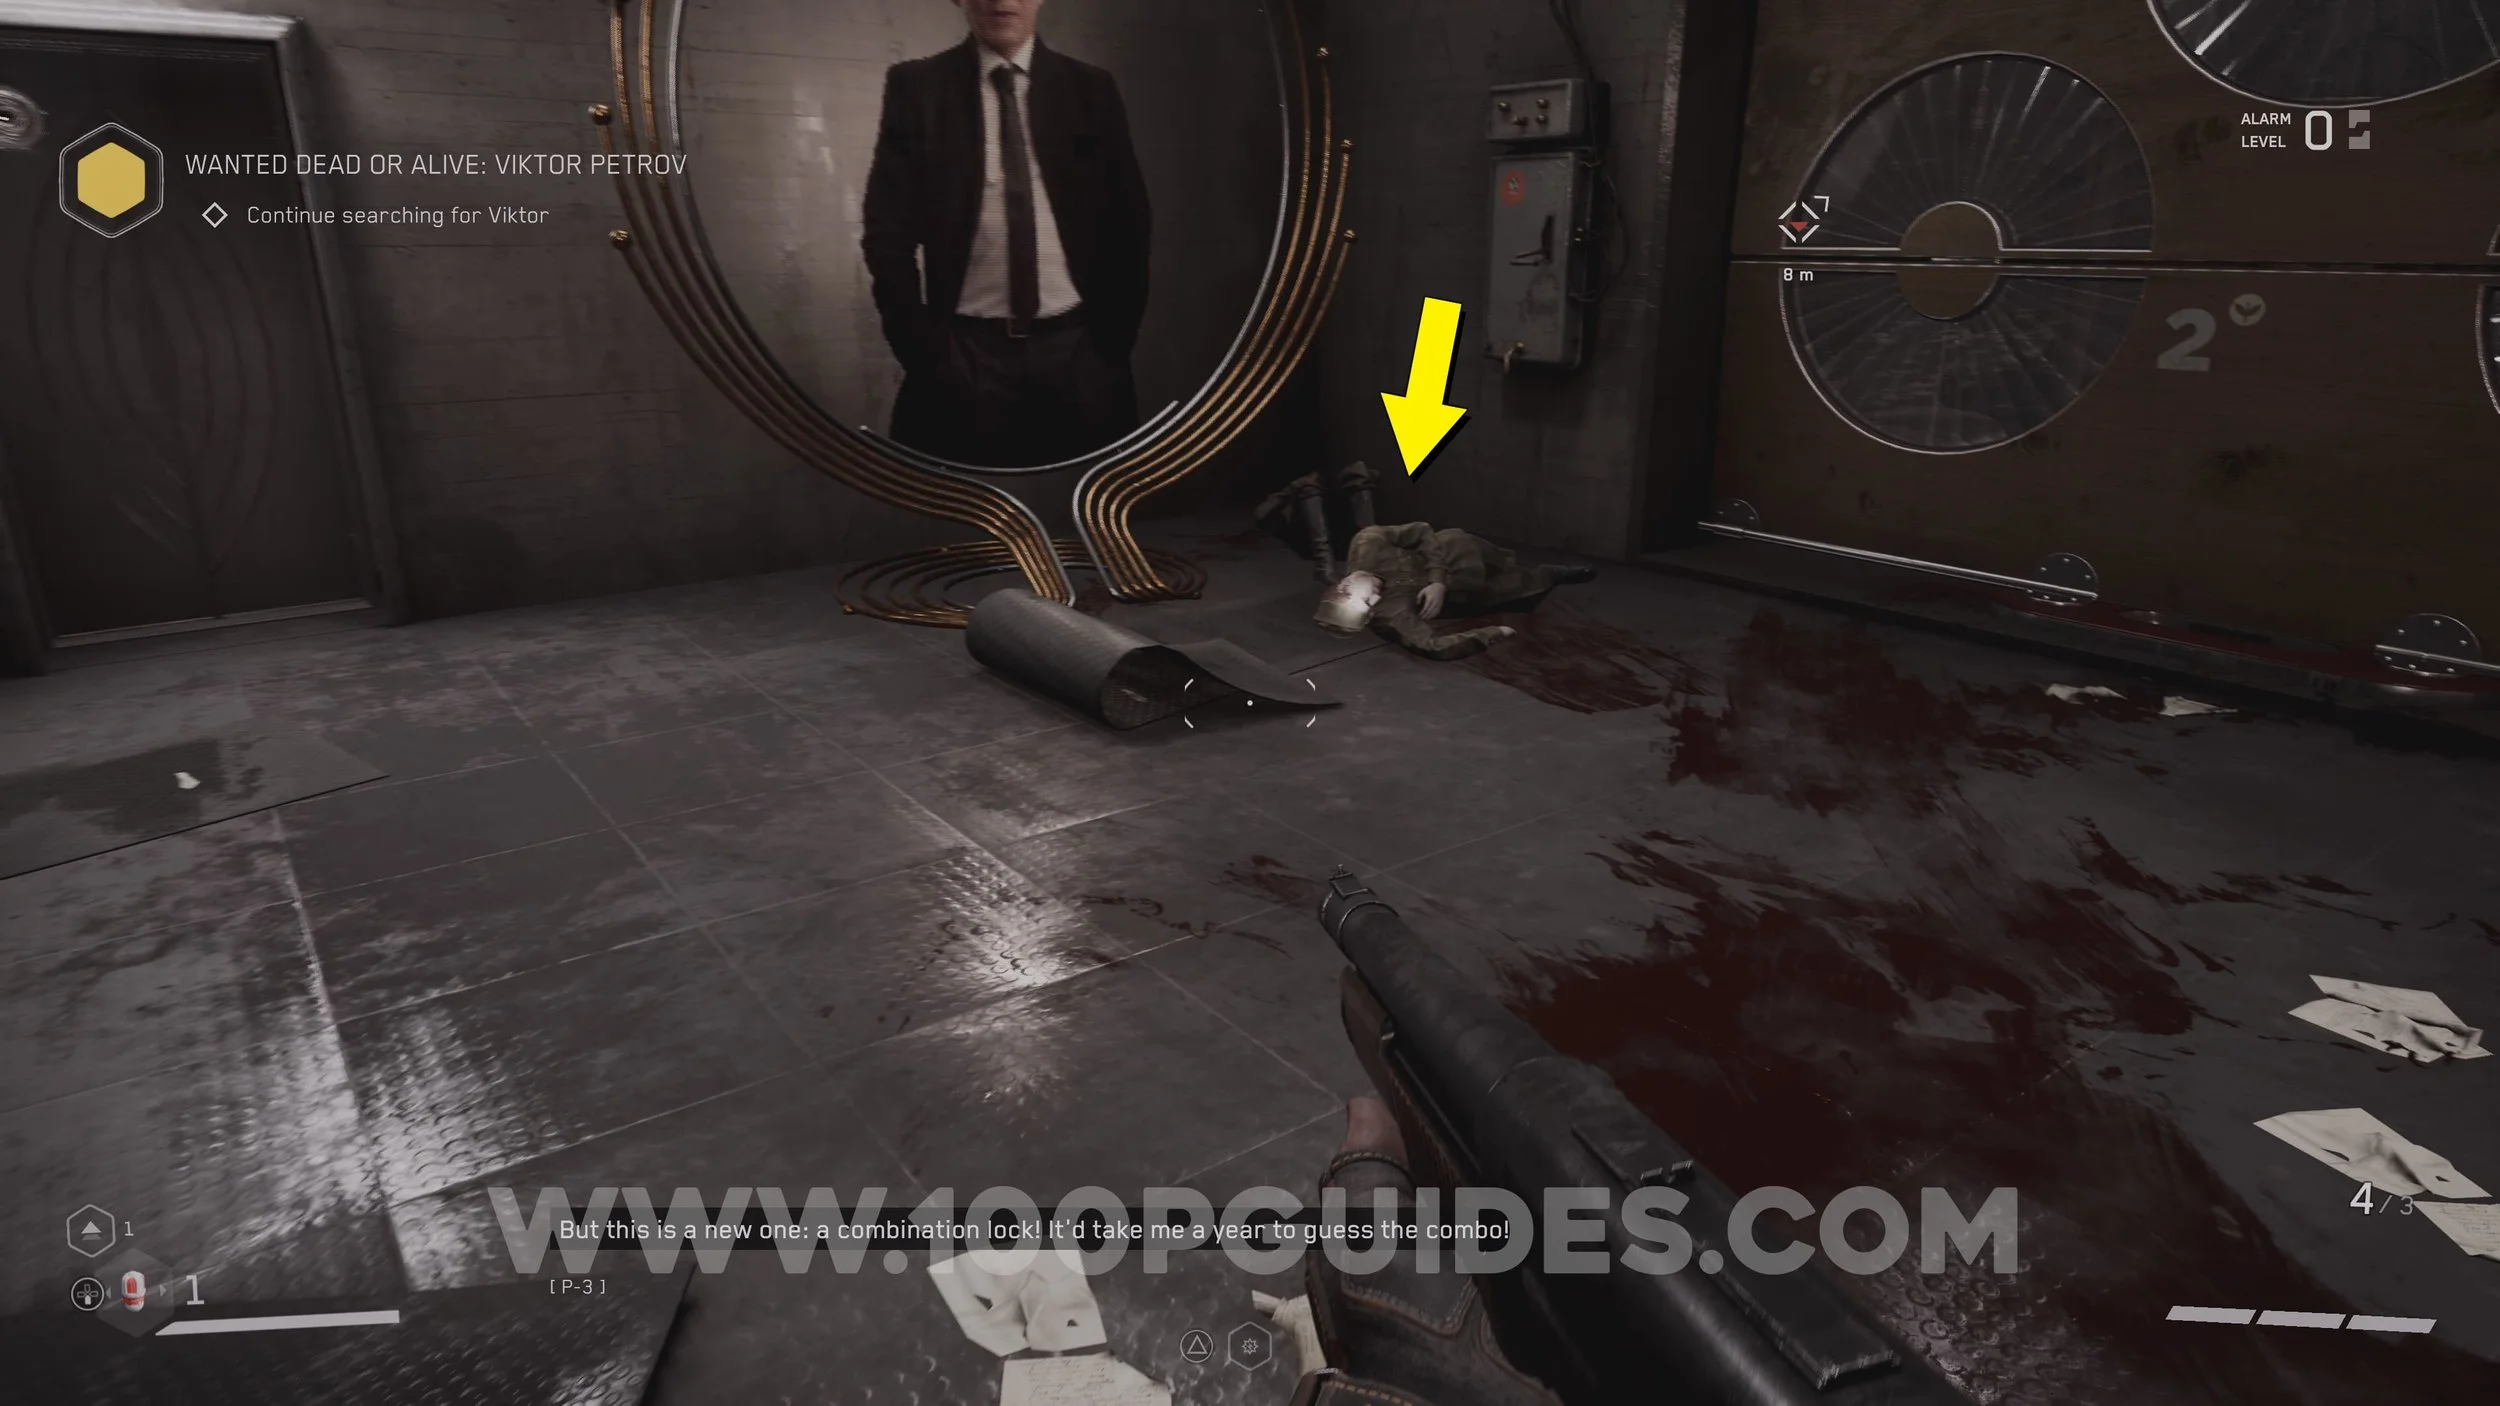
Talking Corpse #1. The first dead you can talk to is found on the ground just after you examine the new type of combination lock (story related). Just press the R1/RB to talk to him.
Talking Corpse #2. After the cable car chases with you on it, you will have to do some climbing and platforming while avoiding the drill bot. After that, you will go through a tunnel on the left. The talking corpse will be in the middle of the next room.
Chirper #8. After a cutscene with Vicktor you will be in a room with a big white birchtree in the middle. The Chirper is next to the tree.
Talking Corpse #3. After picking up the previous Chirper you will have to go up some stairs on the side of the area. You will then enter a room. The dead can be found to your right in this room.


Chirper #9. After the talking corpse you will crawl through a vent to get to the room where the "candle" is found (main objective). The Chirper will be on the table next to the "candle".
Chirper #10. After using Polymer to get to the floor above the room with the out of control cargo bots, you will find the Chirper on the shelf near the door that you have ot take to exit this room.


Chirper #11. On the box next to Petrov's corpse (story objective).
Chirper #12. After returning to the birchtree with the 2 candles you will now have to retrieve 4 canisters. First go through the door that takes you to the Hot Workshop & the Algae Workshop. As soon as you enter the hall on the other side of the door look for the Chirper on the boxes to your right.


Chirper #13. From the previous collectible, go down the hall on the right to enter a room with red walls. Here, go up the stairs at the other end. Then, continue on this path to get to the boiler room. Now, go through the door on the other side of the boiler room (this is the room where you can insert the cryo candles in to the tube). The Chirper will be on a desk in this room.


Chirper #14. After solving the boiler room puzzle and cooling all 3 boilers, go up the stairs to the right of the door that takes you to the room where the previous collectible was. At the top go down the hall to the right and look out for a box on your left with the chirper on it.


Chirper #15. Continue to the end of the hall (where the safe room door is) and take a left. In the big room, use the cargo bot and platforms to get to the canister. The Chirper will be on the same platform as the canister.
Chirper #16. After placing the Hot Canister back at the birchtree, go back down the Algae Workshop & Hot Workshop hall. Go to the end (you should have a safe room to your left) and go through the door on your right. Then, enter the room on your left. You will find a Chirper on one of the tables near the middle of the room.
Talking Corpse #4. Go through the door straight in front of you (standing where the previous collectible was). Then, go all the way down to the end of the hall. Here, turn right to find the dead at the end trapped upder some boxes.


Talking Corpse #5. On the same platform where you find the empty canister in the Algae Workshop.
Chirper #17. Found on a box next to the device that you use to fill the canister in the Algae Workshop.
Talking Corpse #6. Once you return the first 2 canisters to the birchtree, you will now have access to the hall on the other side of the room that goes to the Pesticide Workshop & Cold Workshop. Go to the end of the first hall to find the dead corpse.


Talking Corpse #7. From the previous corpse, go right and continue through the Cold Workshop until you have to climb in to a vent, just before the vent you will see the corpse.
Chirper #18. After going through the vent after the talking corpse, go left to find the chirper on the table in the corner.


Chirper #19. After solving the animal puzzle, you will enter a massive room with plants in it (same room where you have to wait until the canister fills up). Here you will find a chirper near the plants at the bottom of the stairs.
Chirper #20. After talking to the scientist in the Pesticide Workshop, continue and walk past a safe room. On this same catwalk you will see a chest. Next to the chest you will see a corpse with a Chirper next to it.


Talking Corpse #8. From the previous collectible, go down the stairs. At the bottom look for an arch covered in plants that has the number 4 above it. The talking corpse will be under the arch.
Chirper #21. Follow the rails until you see a big green door in front of you. Here jump up to the metal stairway on your right. The chirper will be close to the dead body at the top.
Chirper #22. Continue through the area until you enter the room with the massive canister (main objective). Here, go through to the room on the other side. The Crirper will be on a corpse near a spinning platform with a winged container on it.


Talking Corpse #9. On the metal catwalk above the previous Chirper. To get there, climb the stairs behind where the big yellow canister on tracks starts (main objective) and jump across to the first magnetic platform. Then, move the next platfrom allowing you to jump back in to the upper level of the room where the previous Chirper was. Jump across the platforms to get to the catwalk where the talking corpse is found.


Chirper #23. Found under a piece of metal next to the NORA behind you after the cutscene where you blow up the massive plant (This collectible may be bugged at the moment, the metal prevents the player from picking the chirper up. If anyone has any idea on how to get this, please leave a comment below).


Forester (Story Location)
NOTE: ALL COLLECTIBLES IN THIS AREA ARE MISSABLE!
Chirper #24. Once you leave Facility 3826 you will be in a small town. Here go up a hill to the left of the red building you emerge from to find the Chirper on a corpse in a wooden barn.


Chirper #25. Found under a scarecrow in the field. You will have to hit the scarcrow to be able to collect the chirper.


Chirper #26. Near a statue of a dog.


Chiper #27. Found in the tower where the Volan is. You will go here during the story. Once as soon as you get to the village and once after talking to granny to get the codes to the Volan.
Chirper #28. Found on a table on the right just before you exit through the gates to leave the village.


Talking Corpse #10-13. Once you try and get on the train you will have to look for a ticket. There will now be 4 talking corpses around the area marked as main objectives. Talk to all 4 of them.

Exhibition Center Electromagnetic Mirror Facility (Story Location)
NOTE: THIS IS THE AREA YOU GO TO FIX THE MIRROR TO ENTER THE EXHIBITION CENTER. ALL COLLECTIBLES IN THIS AREA ARE MISSABLE!
Talking Corpse #14. After defeating the Hog-7 boss you will have to enter an electromagnetic facility to fix a mirror. The talking corpse can be found in the big room with the magnets on the ceiling.


Talking Corpse #15. From the previous corpse, continue through the facility until you get to a second big room with magnets on the ceiling. The corpse will be in the corner of the lower level in this room.
Exhibition Center (Story Location)
NOTE: THIS IS THE BUILDING YOU ENTER AFTER FIXING THE MIRROR. ALL COLLECTIBLES IN THIS AREA ARE MISSABLE!
Talking Corpse #16. As soon as you enter the exhibition building, follow the room around to the left until you see an open door on your left. Inside you will find the talking corpse.
Chirper #29. Exit the room with the corpse to find a combination lock on the door in front of you (the combination can be found on the board in the room where the corpse was). Open the door to find the chirper on the plaza model in this room.


Chirper #30. On a desk In the room where you get Tereshkoba’s arm.

Talking Corpse #17. In the area where you have to do the Darwin Test, go through the door on the left to find the talking corpse.


Chirper #31. In the safe room to your left when following Tereshkoba down the hall after the Darwin test.
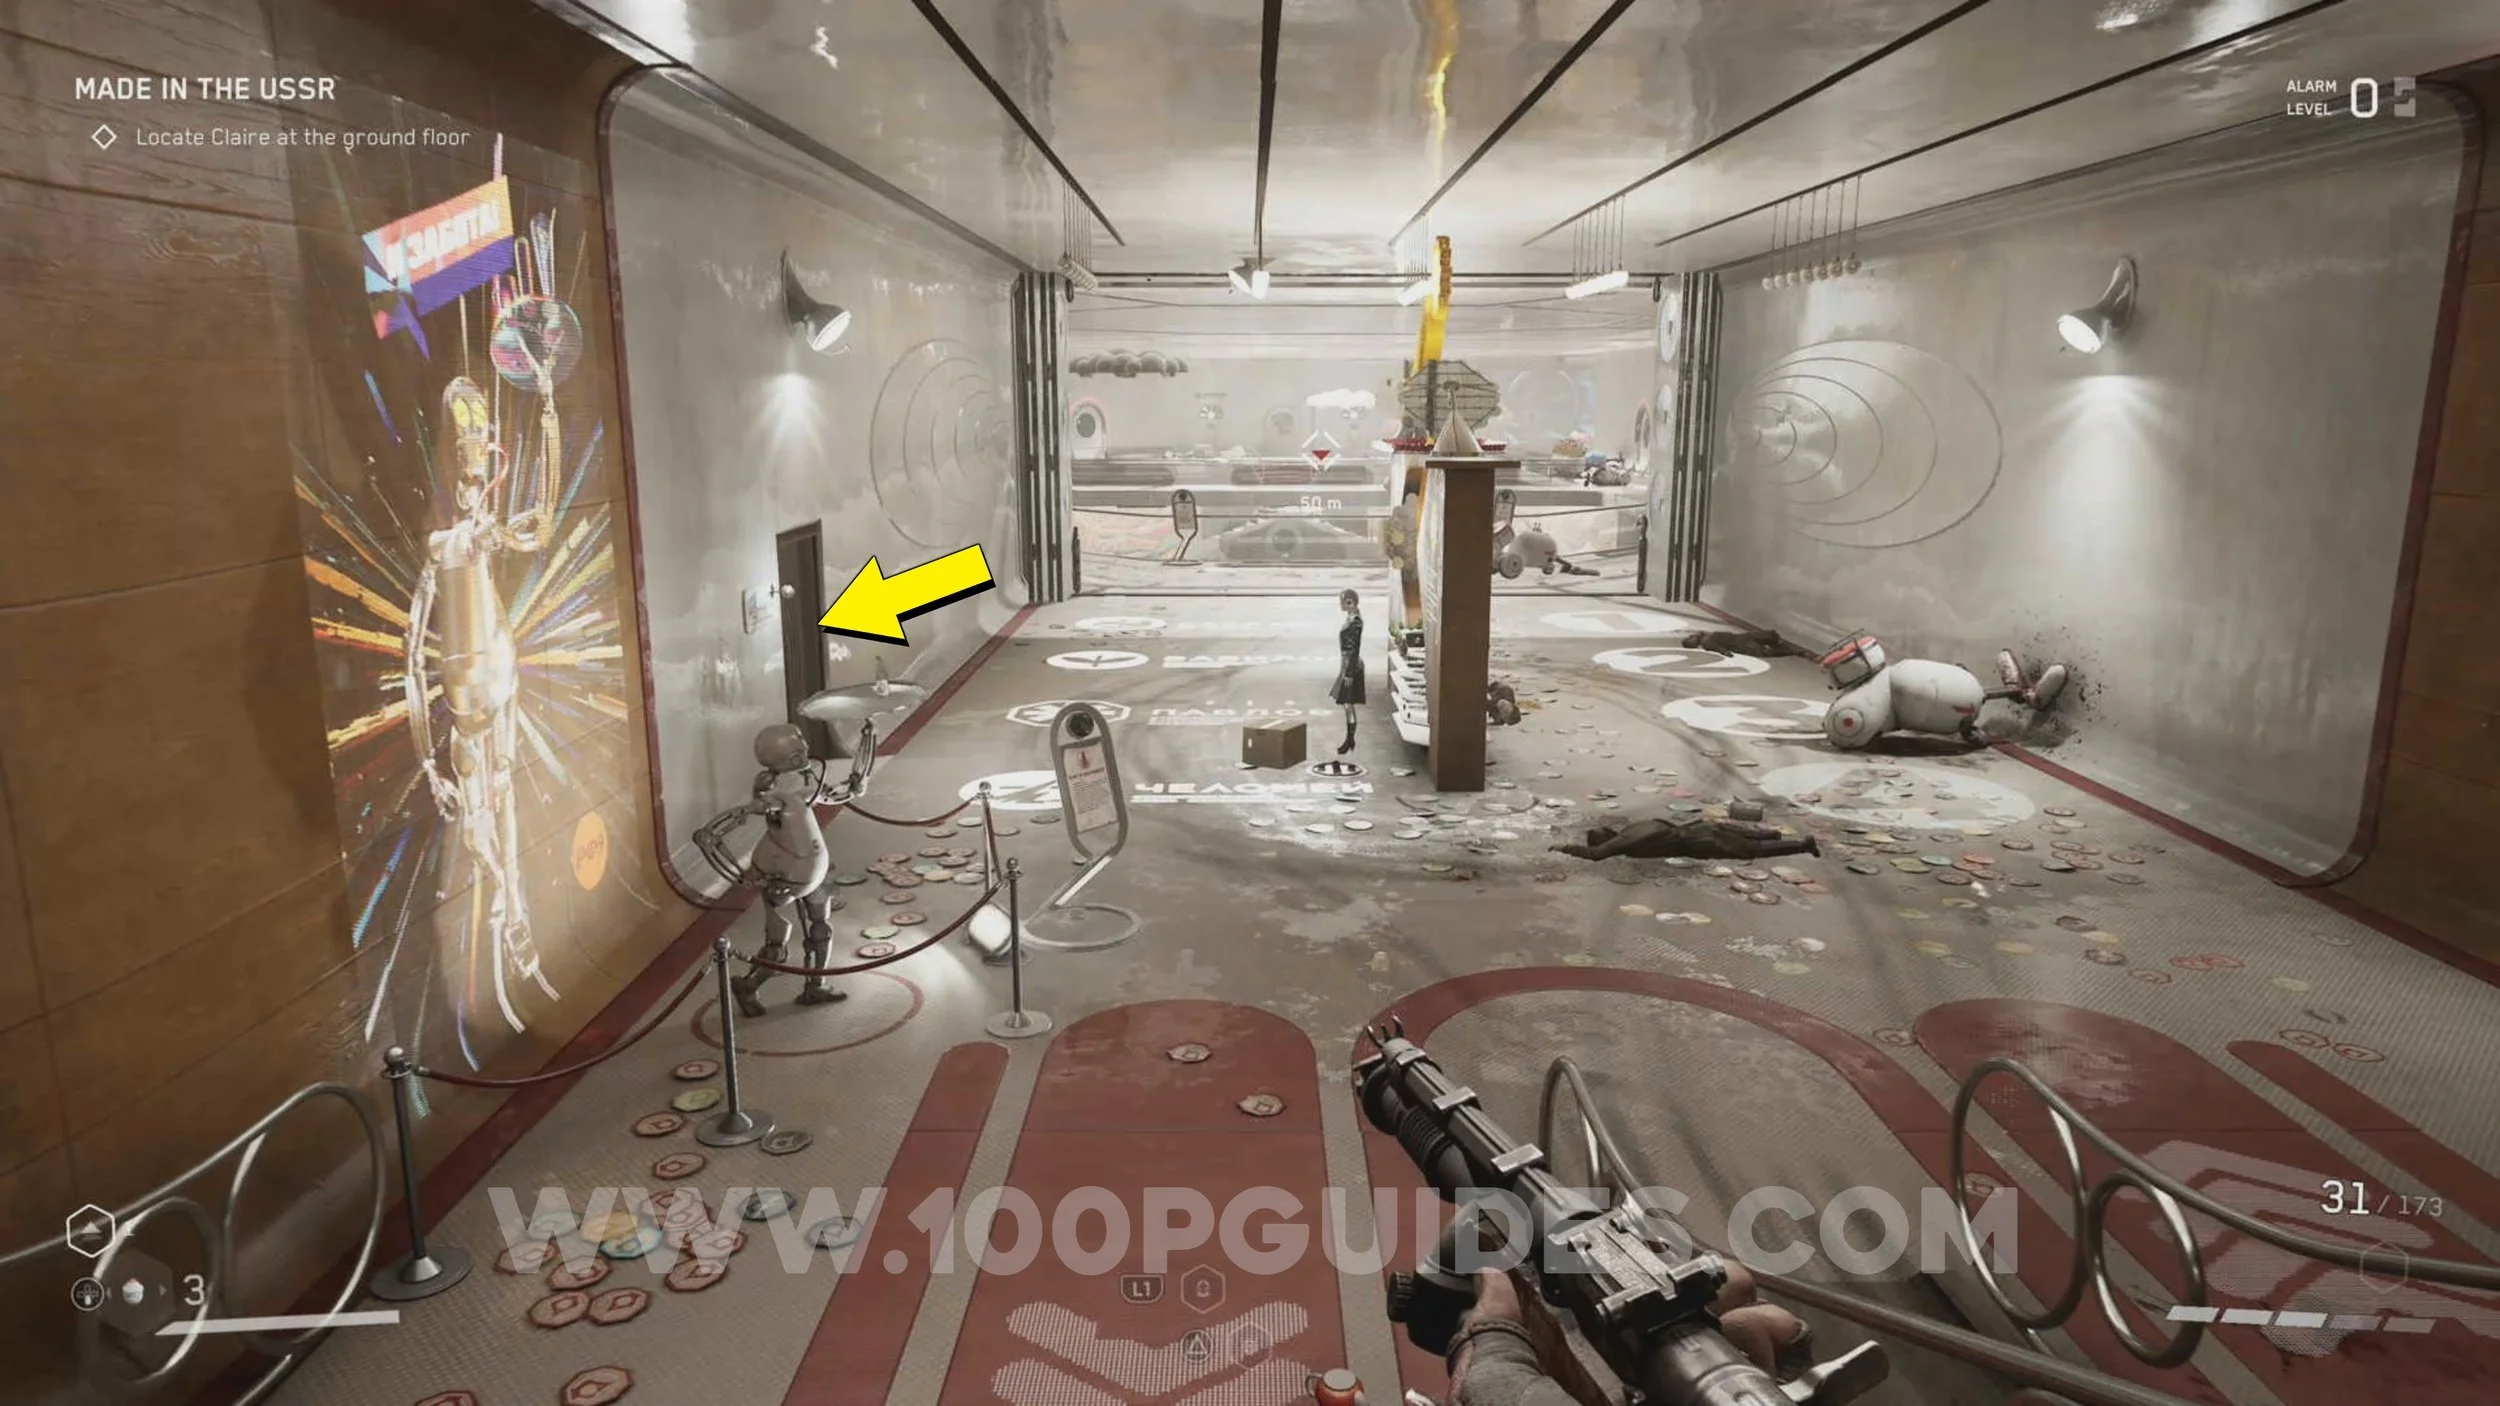
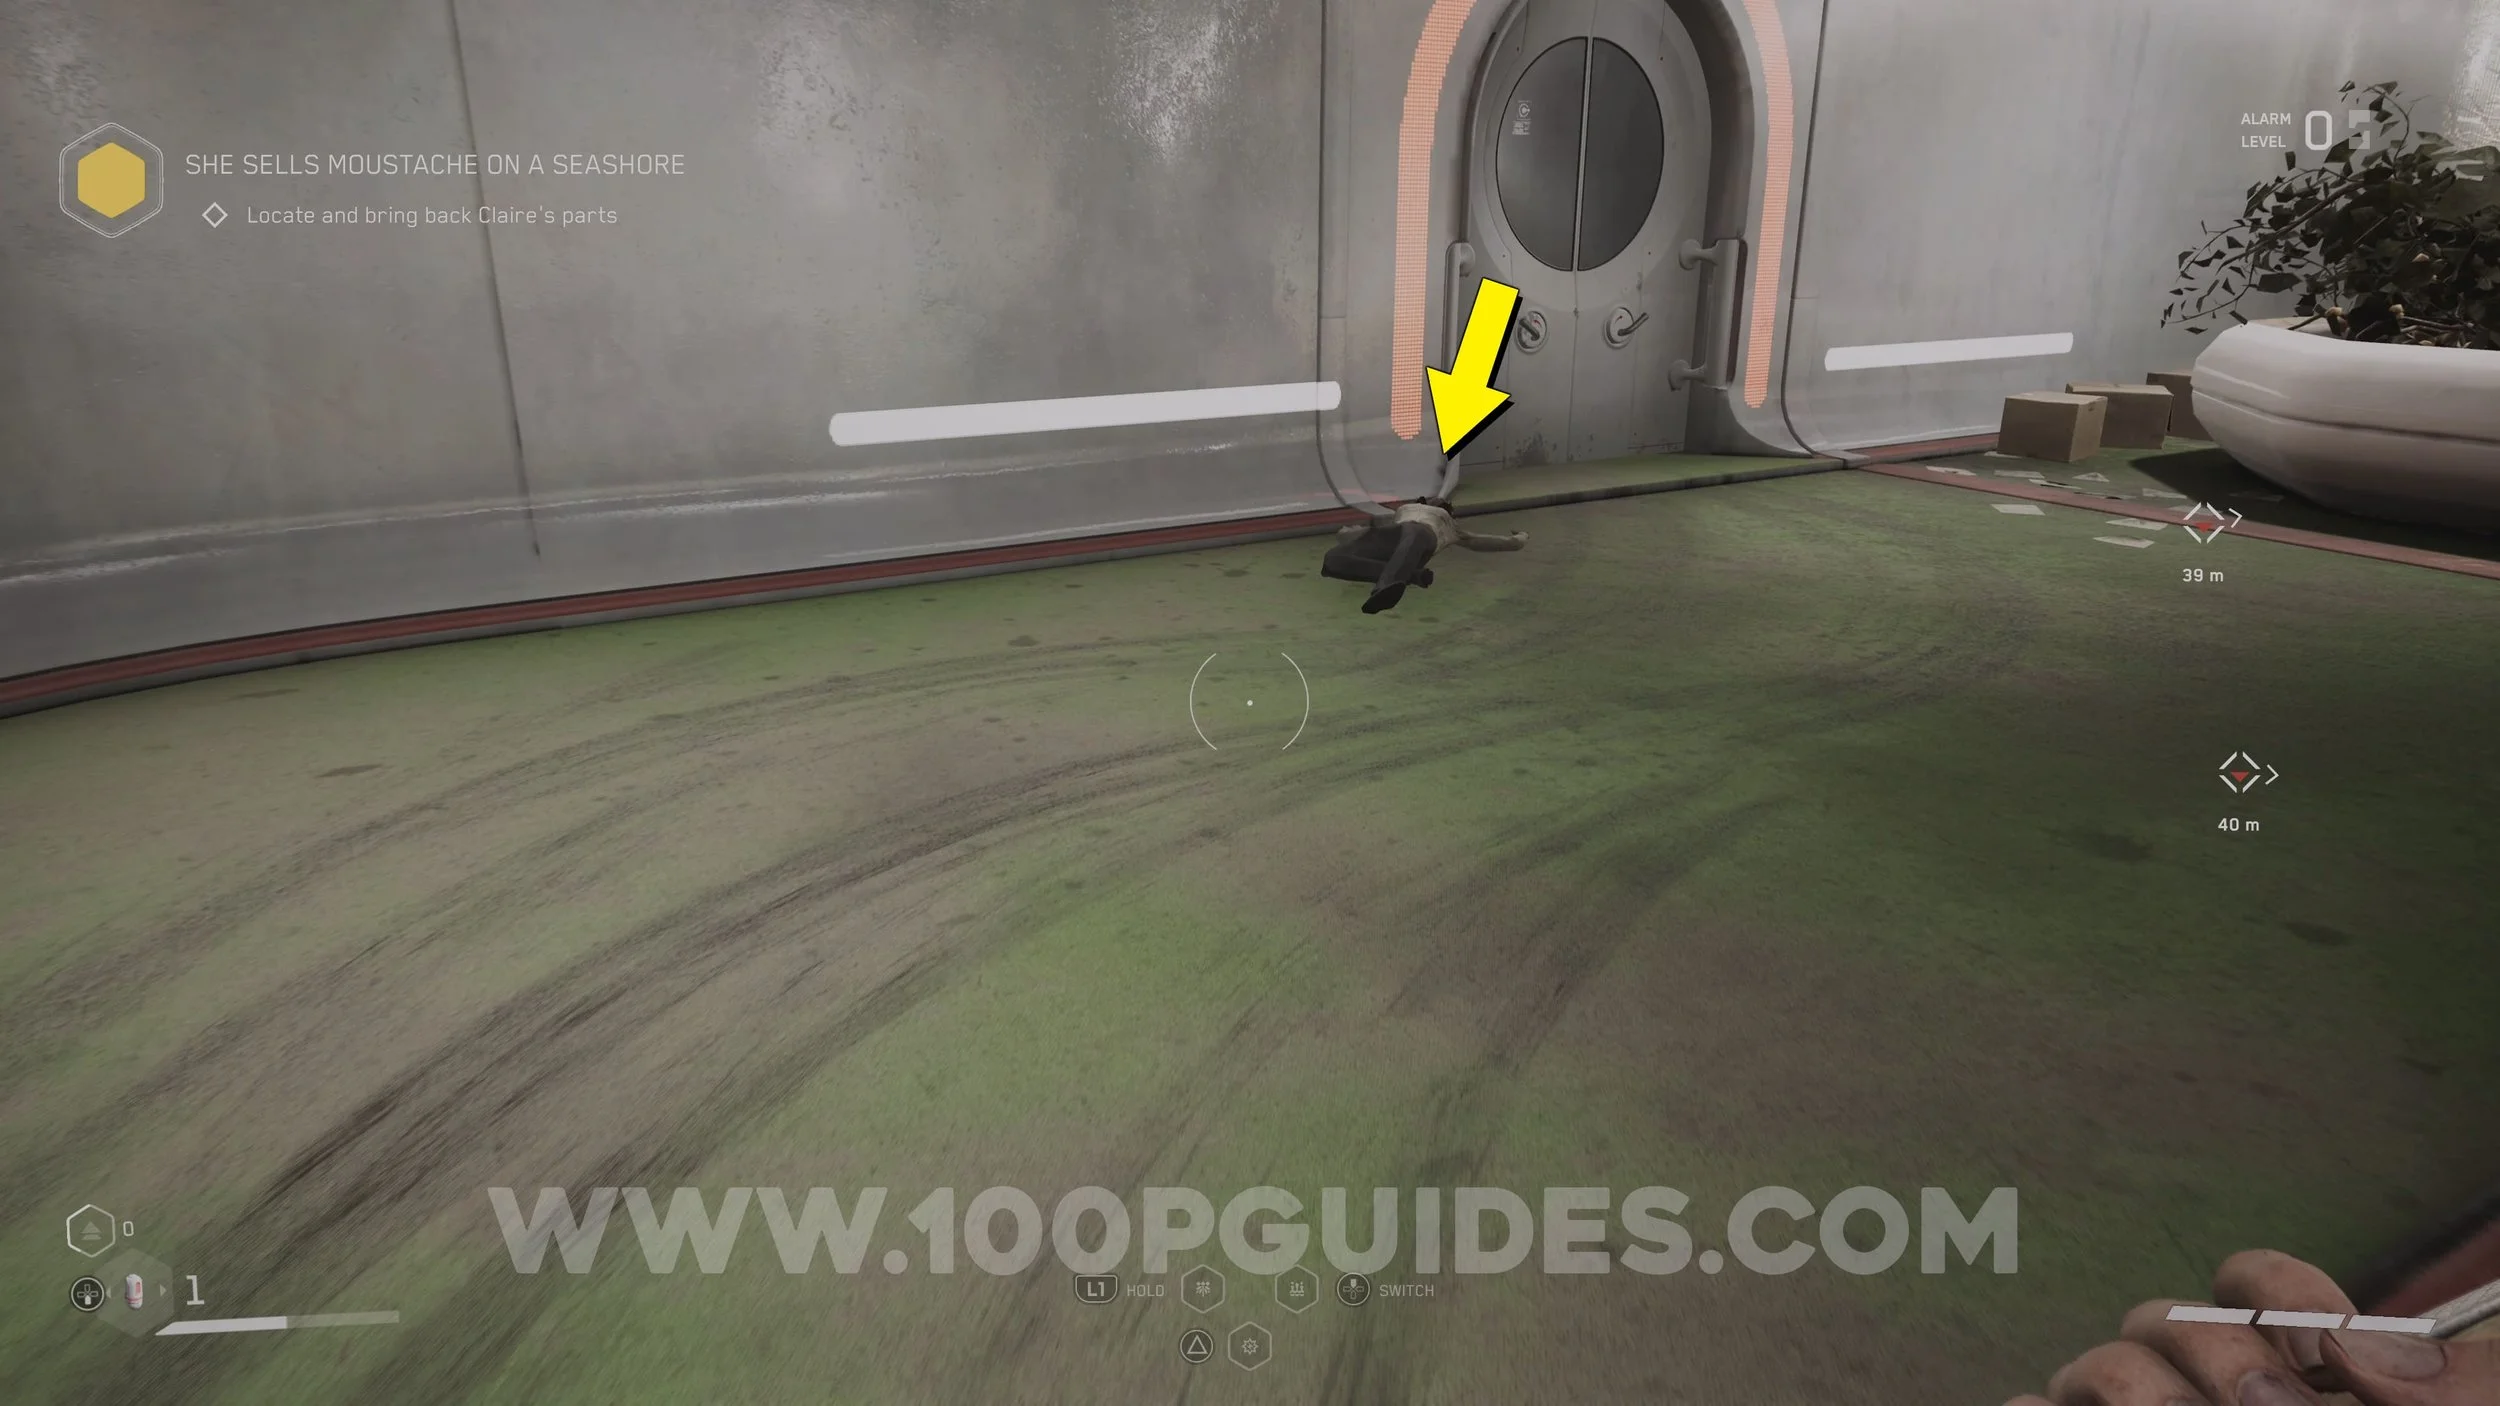
Talking Corpse #18. Once you get to the 3 floor area where you have to find Claire’s parts, go to the other end of the top floor (the floor you start on) to find the corpse near a chest.
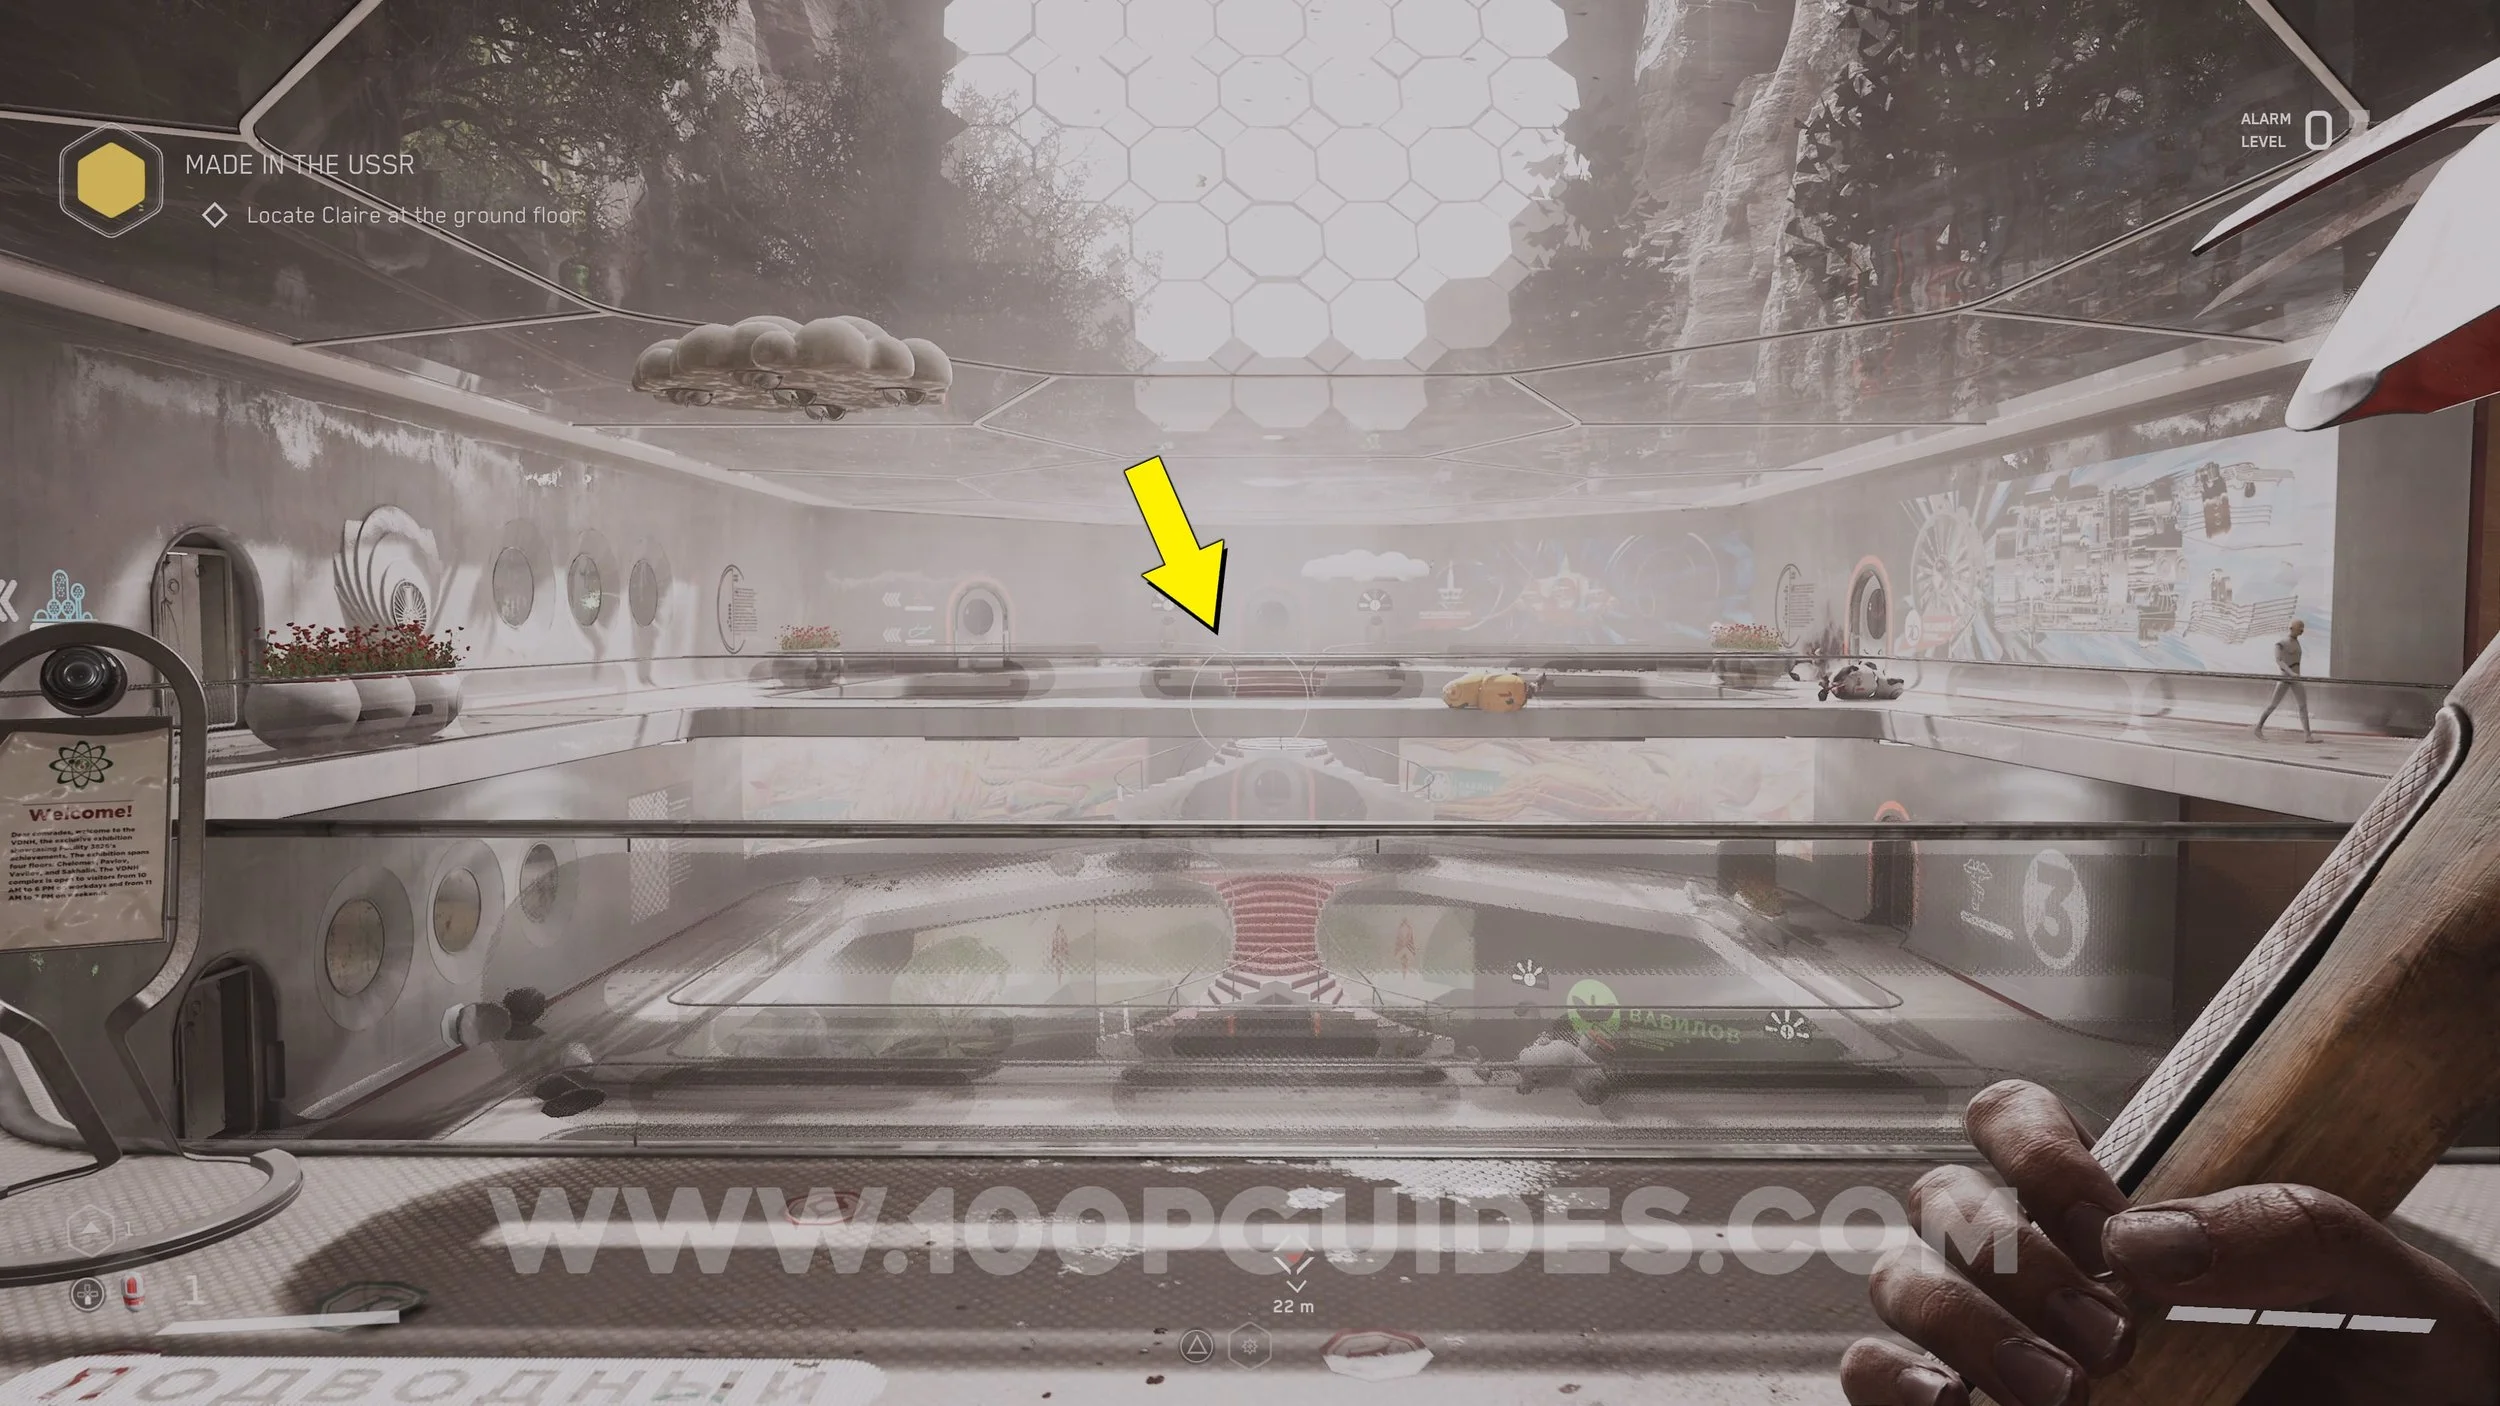
Talking Corpse #19. From the previous corpse, head down 2 floors. Then, stick to the left side to find another talking corpse.
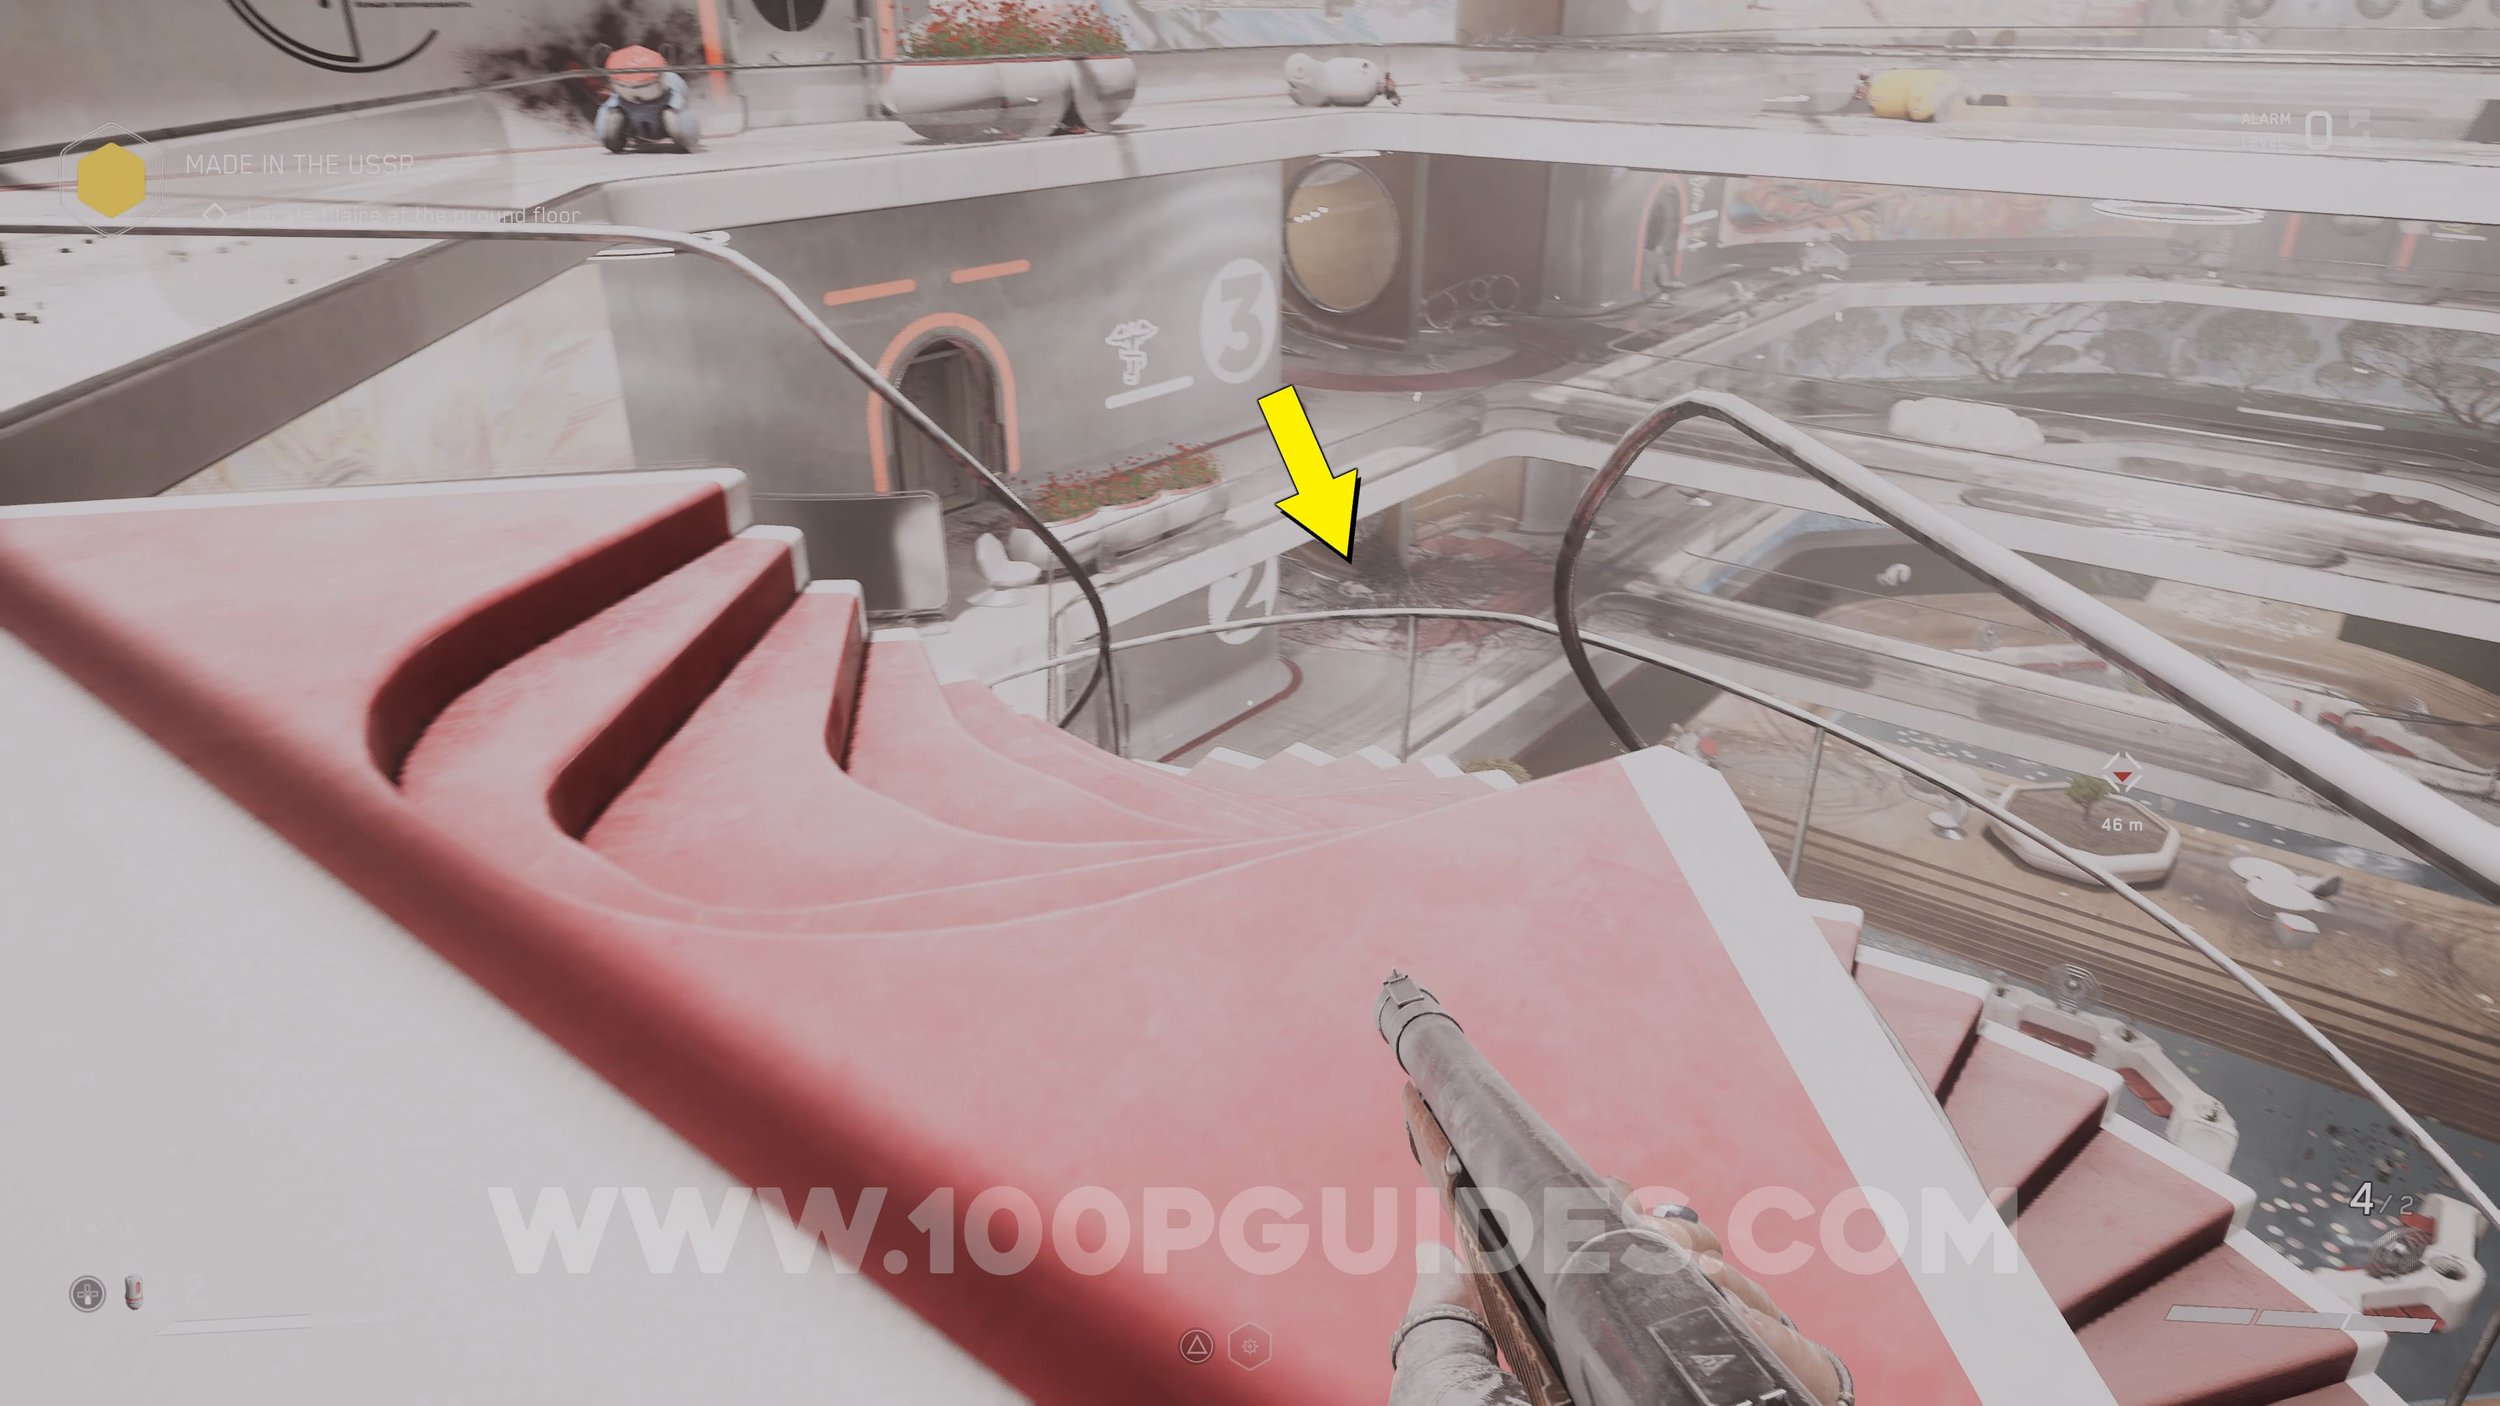
Talking Corpse #20. On the same floor as the previous corpse, head across to the opposite side where you will find a lunar lock. Enter the door on the left to find the corpse in this room

Talking Corpse #21. After talking to the previous corpse, the door next to you should open. Go through and up some stairs to find this corpse on your left.
Chirper #32. You will now have to get the 3 canisters to open the lunar lock. The first can be found in the next room after the previous talking corpse. The second can be found next to talking corpse #20 and the final canister is found in the plant right in front of the lunar lock. Once you insert all 3 canister enter the door to the right to find the chirper next to a corpse.


Chirper #33. Go down to the bottom floor to find the chirper on a red chair.
Chirper #34. After “talking” to Claire on the bottom floor, you will now have access to the other doors in the area. Take the door on the opposite end of the bottom floor. Then, continue on the only possible path until you see a door in front of you and another to your right. For this chirper, take the door in front of you to enter a room filled with enemies. Here you will find the chirper near the doll watching TV.


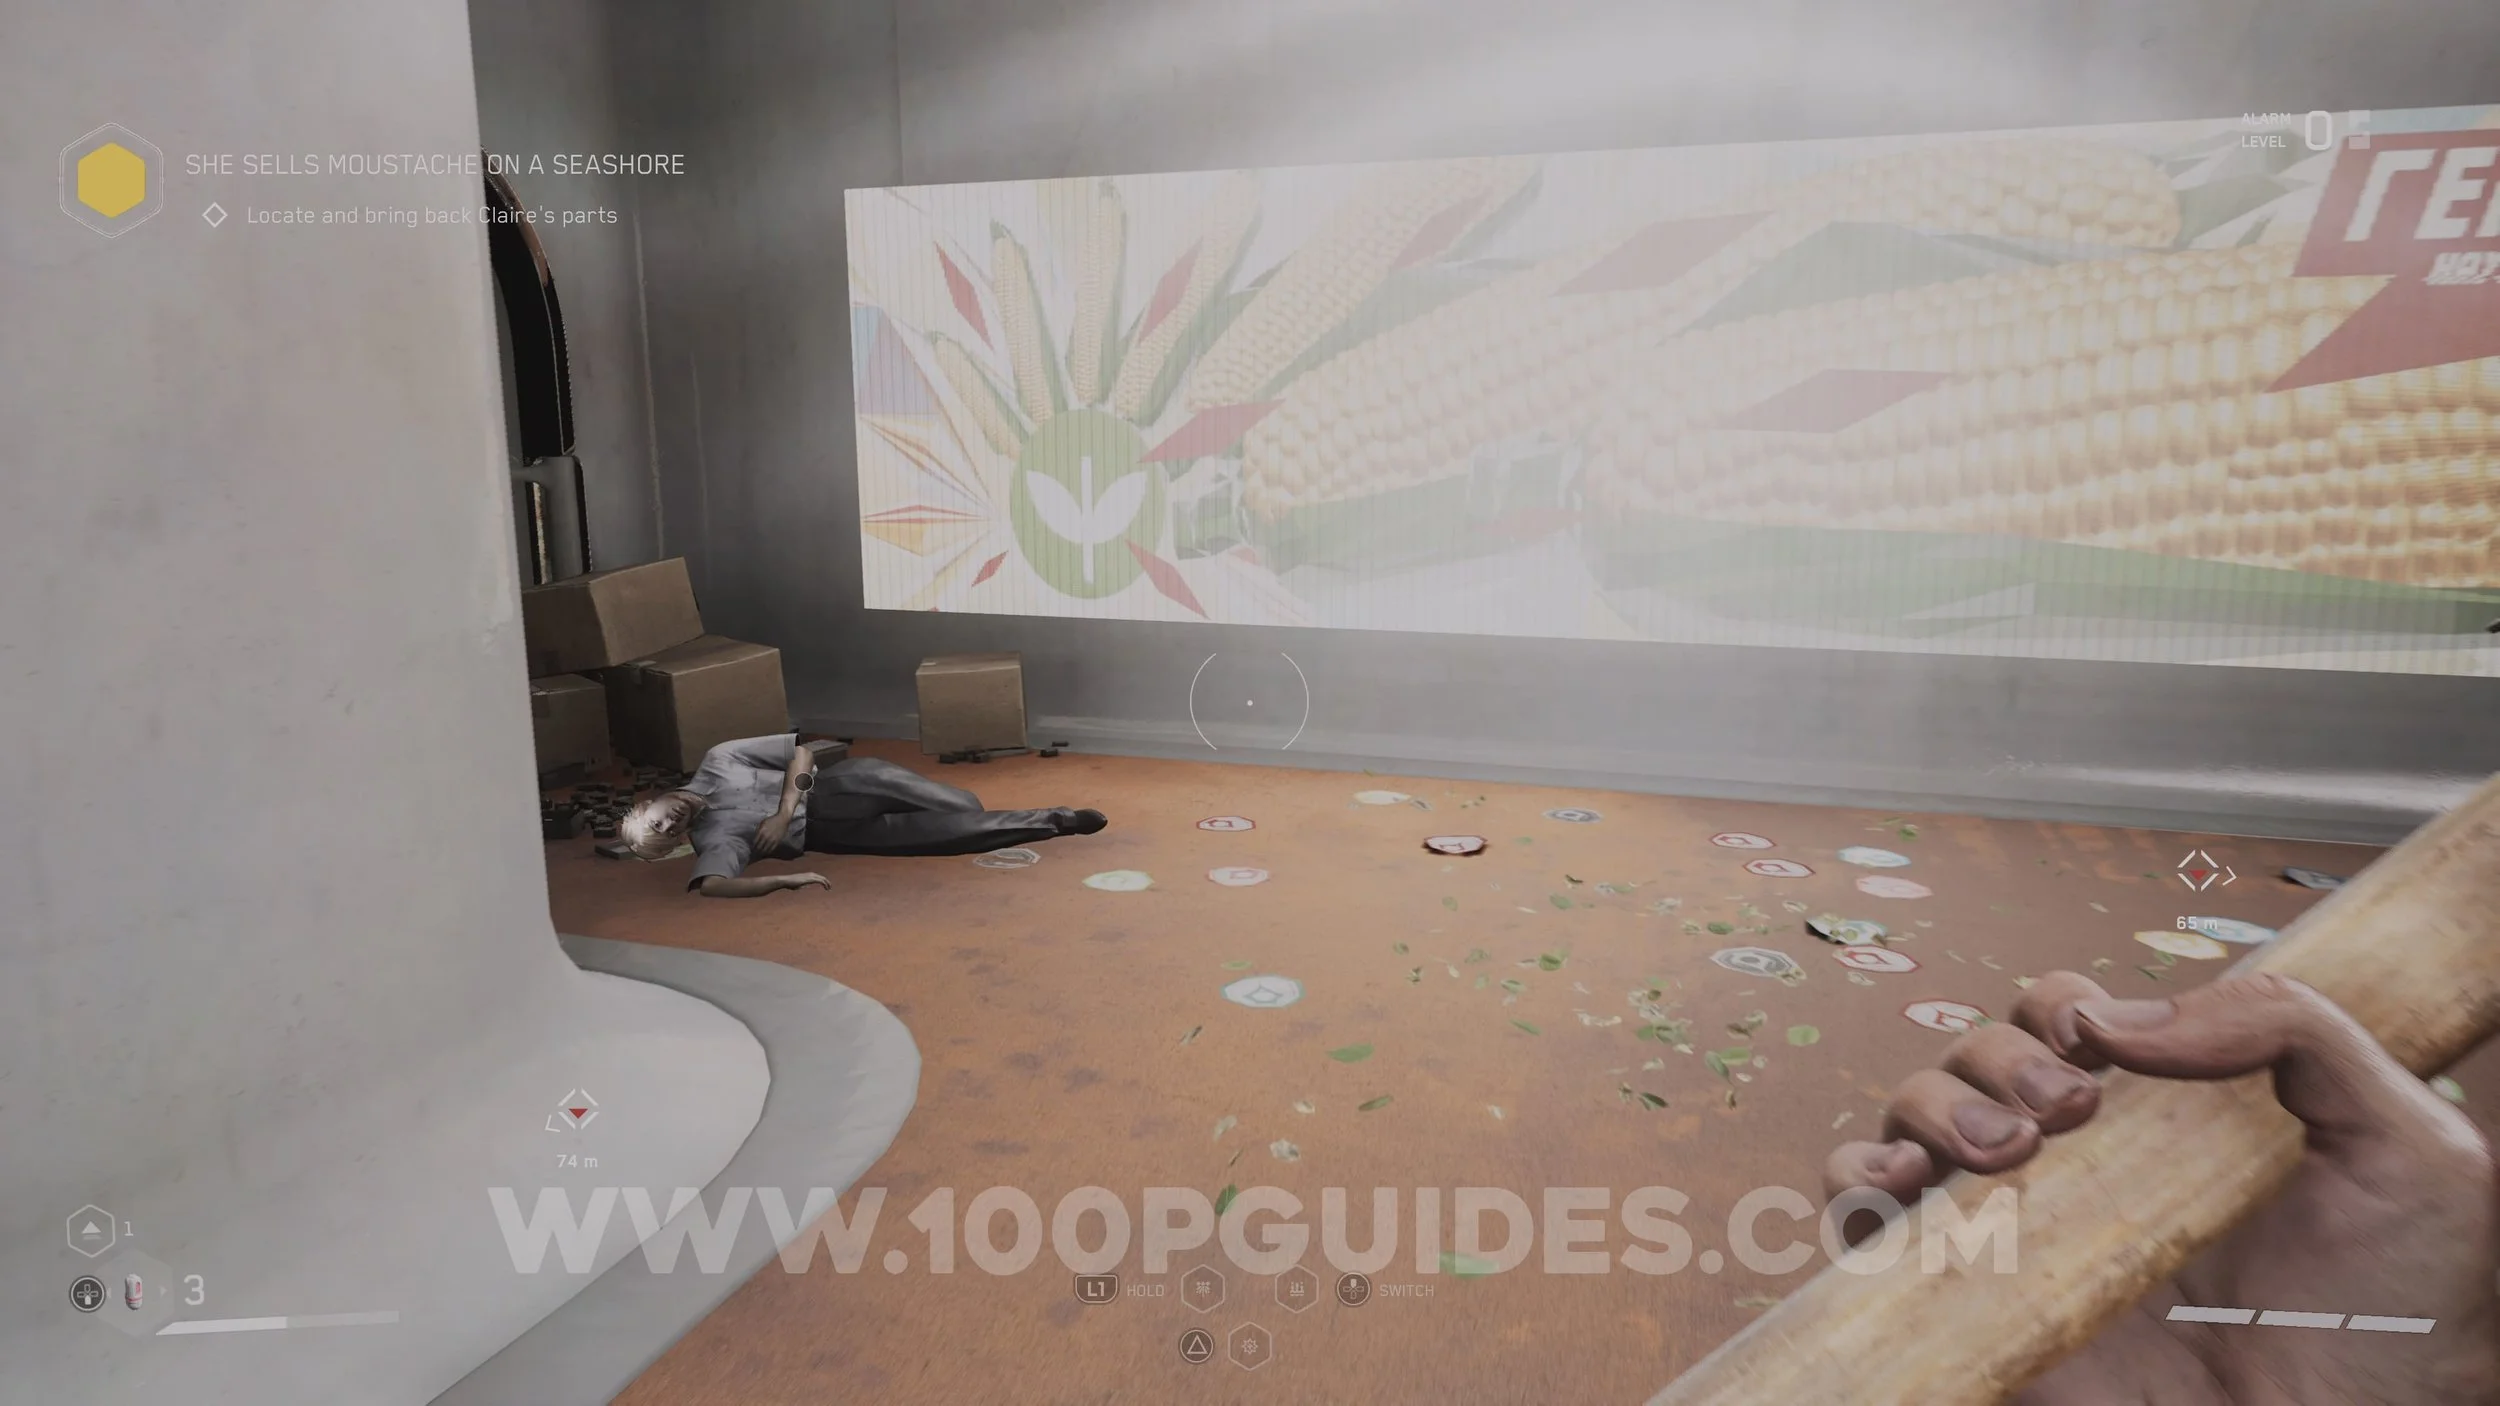
Chirper #35. This one can be found by going through the door on the 3rd floor (where the Claire’s left arm is found). Continue on the only possible path until you get to a room with a massive see through whale. The chirper will be on the table in front of you.


Talking Corpse #22. To you right after picking up the previous collectible.
Chirper #36. In the arena where you fight the Plyusch boss under the massive whale.
Talking Corpse #23. After defeating the Plysch boss, exit the room through the door on the bottom floor. Go past a safe room and in to a room with enemies. The corpse will be in this room.
Talking Corpse #24. From the middle room (where Claire is), go to the very top floor and enter the door that takes you on the path to get her head. Follow the path until you go through a hole to get to the room with the submarine hanging from the ceiling. The corpse will be in the corner of this room.


Talking Corpse #25. At the top of the area where you have to restore the neurolink in a satellite. The corpse will be right next to the puzzle you have to solve inside (puzzle is story objective).
Talking Corpse #26. After returning to the room with the submarine you will have to press the button to crash it. This will allow you to get to the top floor where this talking corpse is found.
Computational Center (Story Location)
Talking Corpse #27. As soon as you enter the building, go left to find a door to a bathroom. The corpse is inside.


Theather (Story Location)
Chirper #37. On the table in the very first room after the Belyash boss.


Talking Corpse #28. After the previous collectible you will take a lift down to the theater. As soon as you exit the lift, go right to find the corpse.
Chirper #38. You will soon go through a hall with display robots dancing in the middle (the ones with buttons that you can press next to them). Go all the way to the end of the hall and use the door to the right to get out of the hall. In the next area you will see a safe room. Go to the left of the door to the safe room to find the chirper on the fridge.


Chirper #39. After defeating a Plyusch you will have to go through a long vent. Once you come out the other side, go right to find the chirper on a table next to the main objective puzzle.
Chirper #40. After solving the puzzle in the room where the previous chirper was, enter the elevator and press the top button. As soon as you get off the elevator, go right to find the chirper near a dancing display robot.


Talking Corpse #29. Next to the previous collectible, you will see a hole in the wall where you can access multiple floors. Jump to the top floor (look for a yellow marker on the wall) to find this corpse.
Talking Corpse #30. In the room below the previous corpse (potentially bugged, this corpse will glow green when scanned, however you will not be able to interact with it).
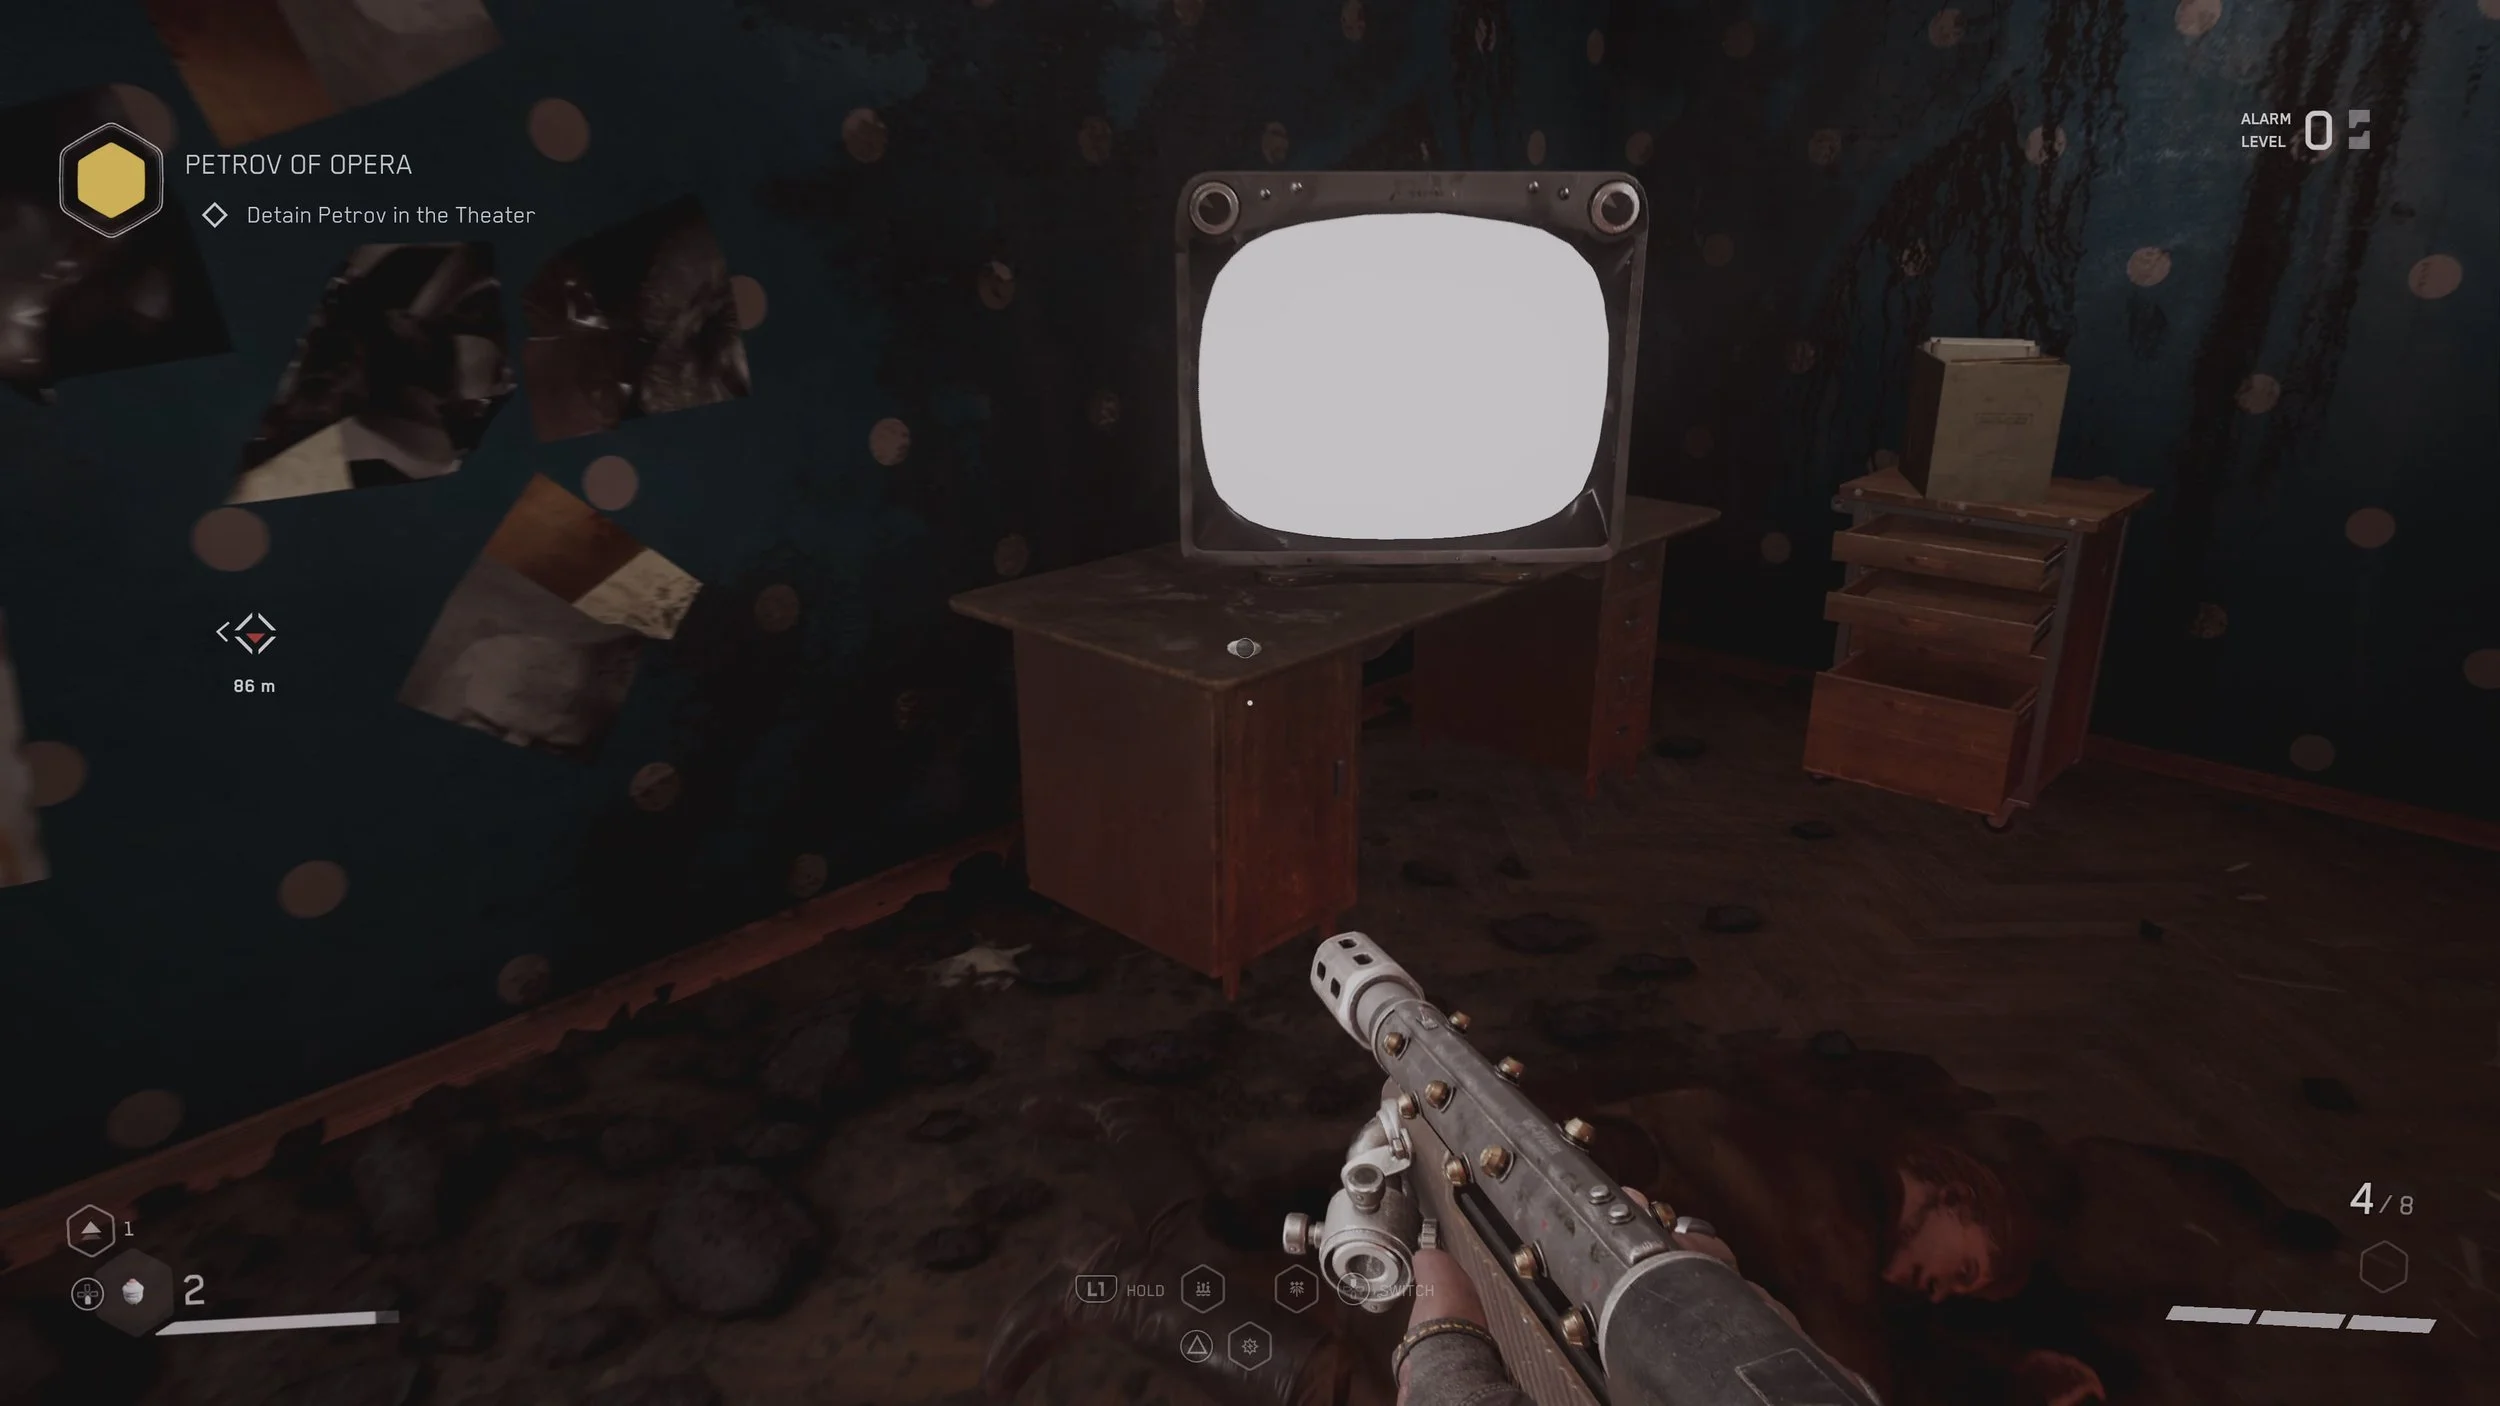
Chirper #41. Found near the TV in the room below the previous talking corpse.
Chirper #42. Exit the room where the previous collectibles where found by hacking the lock on the door. Then, take the elevator back up to the top floor. This time go left and jump across the gap to stay on the top floor. Enter the room at the end to find the chirper near the robot looking in the mirror.


Chirper #43. In the same room as the previous chirper, climb through the vent to the right of the mirror. You will find the chirper in the room on the other side.


Chirper #44. Exit the room where the ballerina and the mirror was. Then jump down to the area below. Here look for a door on the left. The chirper will be on the bar inside.


Talking Corpse #31. Hack the lock on the door in the same room as the previous collectible to find the talking corpse on the other side.
Talking Corpse #32. Return to the room that you jumped down to. Now, go down the hall on the opposite side (story path) until you see a bar on your left. The corpse will be behind the counter.


Talking Corpse #33. You will now be in an open area with some destroyed stairs in the middle. Go through the door on the right (the one next to the semicircle shaped wood). The corpse will be on your right once you get to a room with a robot in it (there are actually 2 corpses together, however they both say the same things).
Chirper #45. Head back to the room whith the destroyed stairs. Head up the stairs and go right to find the chirper on a table in the corner.
Talking Corpse #34. Turn around and go past the stairs you used to get to this floor to find the corpse near a door with a combination lock on it.
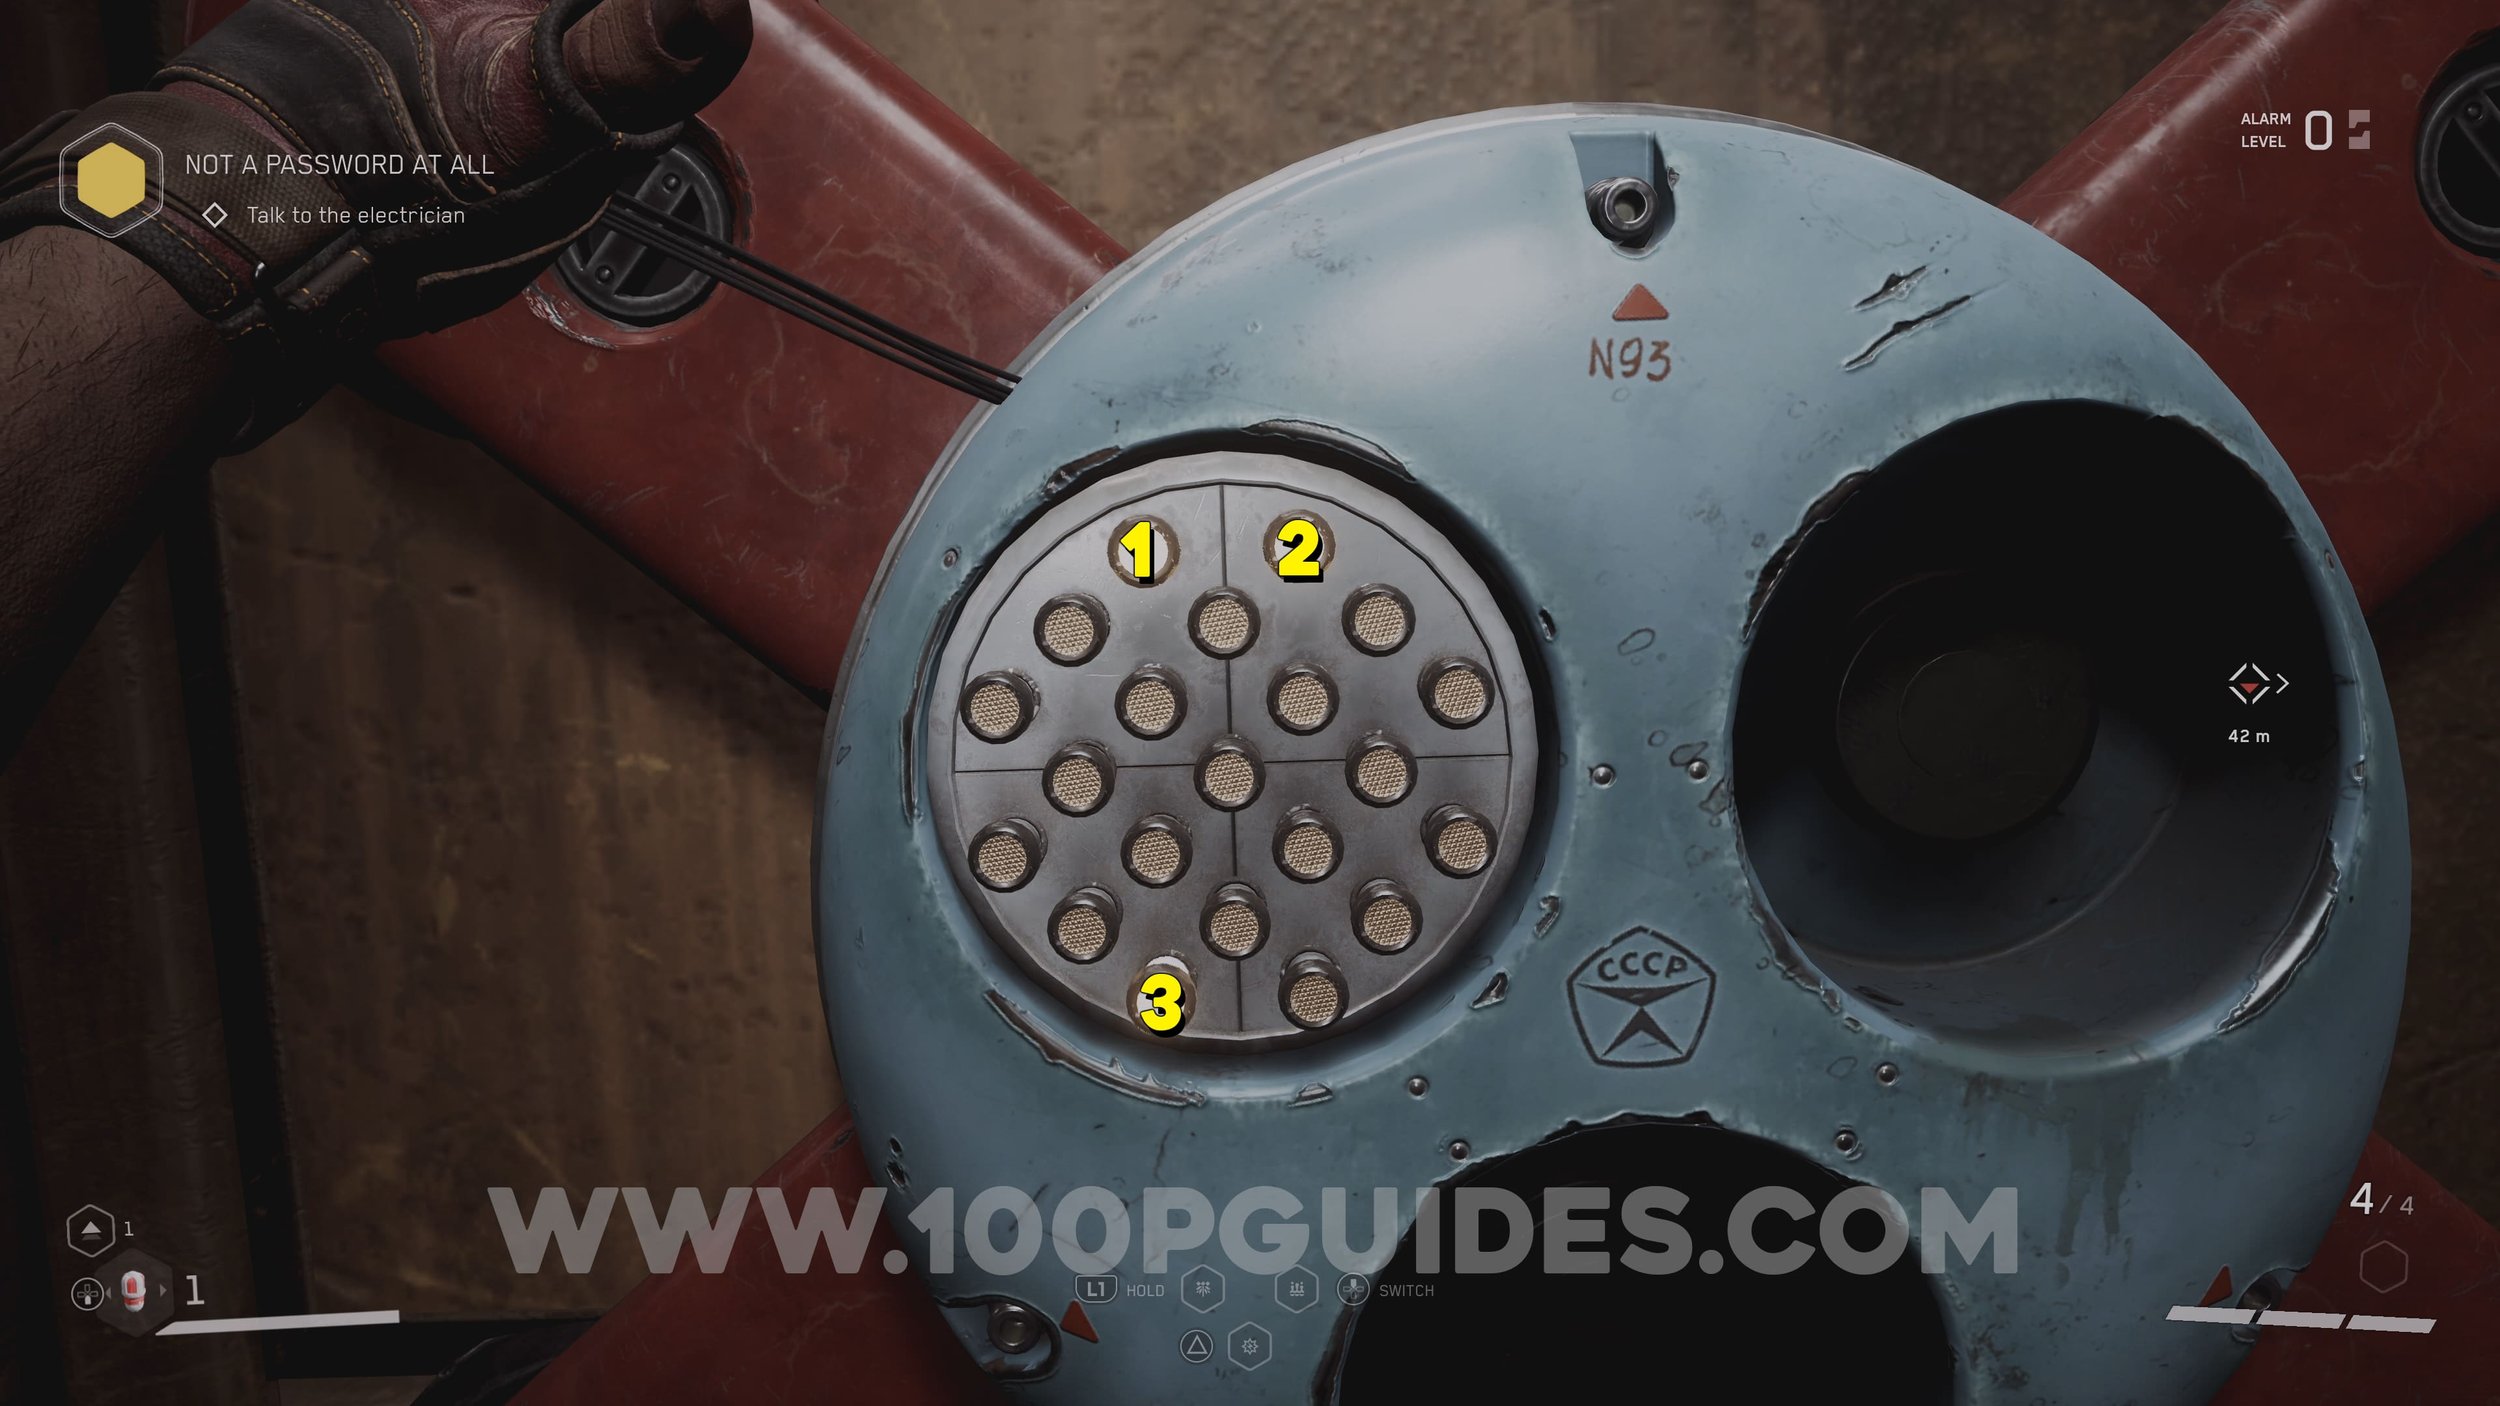
Chirper #46. Found on a table on the other side of the door with a combination lock near the previous corpse (look at the screenshots below for the correct combination).

Chirper #47. Solve the puzzle on the wall in the same room as the previous collectible. Then, interact with the computer in the same room to start the show (story objective). The chirper can be found on the stand where the ballerina is performing.
Chirper #48. After getting the ball from the ballerina and opening the door with it, take the first door on the left. Continue through a few rooms until you find the chirper in the hands of a robot in a red hole


Chirper #49. Head back out and continue down the big hall with the ballerina puzzle until you see a chirper on the red chairs to the right.
Talking Corpse #35. In the same area as you fight the Natasha boss.
Chirper #50. On the ground in the Natasha boss arena.
Chirper #51. On a chair around the Natasha boss arena.
Infirmary (Story Location)
Chirper #52. On the receptionist desk as soon as you enter.


Talking Corpse #36. From the reception desk, head down the hall to your right until you see a door on your left. Go throught it, then through another room to find the corpse.
Talking Corpse #37. Leave the room with the previous corpse through the door on the left. Then, turn right to see a small blue room in front of you. The corpse will be in this room.
Chirper #53. On the medical bed in the next room.
Chirper #54. Return to the entrance and go up the stairs to the top floor to find the chirper on a bed.


Talking Corpe #38. In the corner on the same floor as the previous collectible. This corpse can be a little bugged. If you don’t get the R1/RB prompt, crouch and then approach the corpse.

Pavlov Compex (Story Location)
NOTE: ALL COLLECTIBLES IN THIS AREA ARE MISSABLE!
Chirper #55. In the first room of the Pavlov complex, go around the left side of the hole in the middle of the room to find the chirper on a desk.
Chirper #56. Now take the nearby stairs all the way down to the bottom floor. Here, follow the only possible path to the end. In one of the bathroom stalls you will find the collectible.


Chirper #57. Return to the stairs and go up to the middle floor (next floor up). Here, enter the room straigh in front of you to find the chirper to your right.
Chiper #58. Continue through the complex until you open a door with a key disc. The chirper will be on a bed in the next room.


Talking Corpse #39. In the same room as the previous collectible.
Chirper #59. After the previous collectible you will have to go down an elevator. The chirper will be to your right as soon as you get off the elevator.


Talking Corpse #40. Follow the quest marker through the morgue until you go up some stairs to the 3rd floor. Here you will find the corpse in plain sight near the door with the quest marker.


Chirper #60. Go through the door with the mision marker on it. Then, go right and open another door. Here go straight and then take the door on your right to an open dining area. The chirper will be on a table on the left side of the room.
Talking Corpse #41. From the previous collectible, hack the lock on the door at the end of the dining area. Then, go up the stairs to find the corpse next to the statue.
Chirper #61. Go up the stairs in the same room as the previous collectible to find the chirper.


Chirper #62. In the area with the red polymer animals, go to the 3rd animal (bear to find the chirper near a corpse).
NOTE: AFTER LEAVING THE PAVLOV COMPLEX YOU WILL SEE A WHALE ON THE BEACH. IF YOU DROP DOWN TO IT, THE FINAL PART OF THE GAME WILL START AND YOU WILL NOT BE ABLE TO RETURN. AFTER THE CREDITS MAKE SURE YOU PICK THE “RETURN TO FACILITY 3826” TO CONTINUE EXPLORING POST GAME.
Lighthouse (Story Location)
Chirper #63. On a desk in the first room after climbing through the lighthouse window.
OPEN WORLD COLLECTIBLES
We will divide the open world collectibles by sectors. To know what sector you are in, just look for the closest “HAWK” on the map (So Hawk-01 will be sector 01)
Sector 03
Talking Corpse #42. The Talking Corpse can be found at the end of the monorail platform that you start on after the monorail crashes near the start of the game.


Chirper #64. On a table below the monorail platform.


Talking Corpse #43. In a field to the north west of the station.


Chirper #65. Under a pole near the entrance to the arena.


Chirper #66. In the area where you fight the Hog-7 Hedgie boss.


Sector 06
Chirper #67. Near the safe room in the lake.


Talking Animal #1 (Cow). In the field on the west bank of the lake.


Chirper #68. In a small hut to the south west of sector 06.


Talking Corpse #44. Found on the road to the south west of sector 6 (potentially bugged, this corpse will glow green when scanned, however you will not be able to interact with it).


Sector 04
Talking Corpse #45. In a crater in the field outside the big building.


Chirper #69. On a table just outside the Kollektiv Complex building.


Chirper #70. Near a tree in the village.


Talking Corpse #46. On the wooden deck of the building near the water.


Sector 07
Talking Corpse #47. Near some hay stacks.


Talking Animal #2 (Pig). Near the farm house.


Talking Corpse #48. Near some more hay stacks.


Talking Corpse #49. In the middle of the dirt road.


Sector 05
Talking Corpse #50. On the ground near the spiral stair tower.


Sector 01
Chirper #71. Found on the train tracks.


Chirper #72. Found near a chest on top of the red car on the road.


Talking Animal #3 (Chicken). Near the safe house before the bridge.


TESTING GROUNDS (All Lootyagins)
NOTE: The only collectibles that are found in the Testing Grounds are the Lootyagins. Each one of the 8 testing grounds has 3 Lootyagins. Use the walkthroughs of each of the testing grounds below to solve the puzzles & find the Lootyagins.
Testing Ground 1 Walkthrough
Testing Ground 2 Walkthrough
Testing Ground 6 Walkthrough
Testing Ground 8 Walkthrough
Testing Ground 9 Walkthrough
Testing Ground 10 Walkthrough
Testing Ground 11 Walkthrough
Testing Ground 12 Walkthrough
If you found this guide helpful and would like to support our work, you can do so by pressing the Ko-fi button below